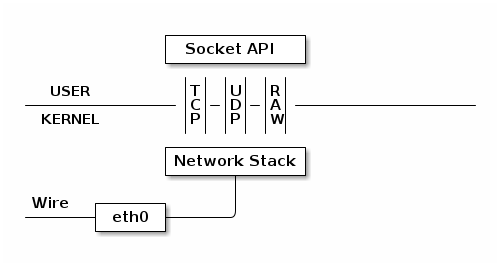
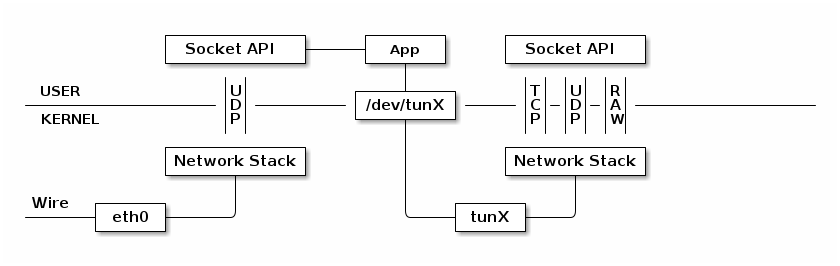
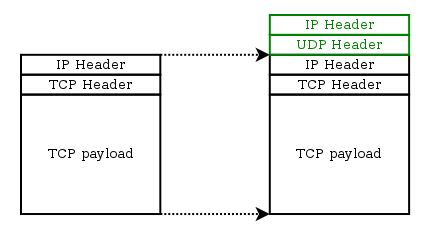
VpnService is a base class for applications to extend and build their own VPN solutions. In general, it creates a virtual network interface, configures addresses and routing rules, and returns a file descriptor to the application. Each read from the descriptor retrieves an outgoing packet which was routed to the interface. Each write to the descriptor injects an incoming packet just like it was received from the interface. The interface is running on Internet Protocol (IP), so packets are always started with IP headers. The application then completes a VPN connection by processing and exchanging packets with the remote server over a tunnel.
/** * Create a VPN interface using the parameters supplied to this * builder. The interface works on IP packets, and a file descriptor * is returned for the application to access them. Each read * retrieves an outgoing packet which was routed to the interface. * Each write injects an incoming packet just like it was received * from the interface. The file descriptor is put into non-blocking * mode by default to avoid blocking Java threads. To use the file * descriptor completely in native space, see * {@link ParcelFileDescriptor#detachFd()}. The application MUST * close the file descriptor when the VPN connection is terminated. * The VPN interface will be removed and the network will be * restored by the system automatically. * * <p>To avoid conflicts, there can be only one active VPN interface * at the same time. Usually network parameters are never changed * during the lifetime of a VPN connection. It is also common for an * application to create a new file descriptor after closing the * previous one. However, it is rare but not impossible to have two * interfaces while performing a seamless handover. In this case, the * old interface will be deactivated when the new one is created * successfully. Both file descriptors are valid but now outgoing * packets will be routed to the new interface. Therefore, after * draining the old file descriptor, the application MUST close it * and start using the new file descriptor. If the new interface * cannot be created, the existing interface and its file descriptor * remain untouched. * * <p>An exception will be thrown if the interface cannot be created * for any reason. However, this method returns {@code null} if the * application is not prepared or is revoked. This helps solve * possible race conditions between other VPN applications. * * @return {@link ParcelFileDescriptor} of the VPN interface, or * {@code null} if the application is not prepared. * @throws IllegalArgumentException if a parameter is not accepted * by the operating system. * @throws IllegalStateException if a parameter cannot be applied * by the operating system. * @throws SecurityException if the service is not properly declared * in {@code AndroidManifest.xml}. * @see VpnService */ @Nullable public ParcelFileDescriptor establish(){ mConfig.addresses = mAddresses; mConfig.routes = mRoutes;
/** * Use IConnectivityManager since those methods are hidden and not * available in ConnectivityManager. */ privatestatic IConnectivityManager getService(){ return IConnectivityManager.Stub.asInterface( ServiceManager.getService(Context.CONNECTIVITY_SERVICE)); }
protectedfinal SparseArray<Vpn> mVpns = new SparseArray<>();
/** * Configure a TUN interface and return its file descriptor. Parameters * are encoded and opaque to this class. This method is used by VpnBuilder * and not available in ConnectivityManager. Permissions are checked in * Vpn class. * @hide */ @Override public ParcelFileDescriptor establishVpn(VpnConfig config){ int user = UserHandle.getUserId(Binder.getCallingUid()); synchronized (mVpns) { throwIfLockdownEnabled(); // mVpns其实是个Vpn数组 return mVpns.get(user).establish(config); } }
/** * Establish a VPN network and return the file descriptor of the VPN interface. This methods * returns {@code null} if the application is revoked or not prepared. * * @param config The parameters to configure the network. * @return The file descriptor of the VPN interface. */ publicsynchronized ParcelFileDescriptor establish(VpnConfig config){ // Check if the caller is already prepared. UserManager mgr = UserManager.get(mContext); if (Binder.getCallingUid() != mOwnerUID) { returnnull; } // Check to ensure consent hasn't been revoked since we were prepared. if (!isVpnUserPreConsented(mPackage)) { returnnull; } // Check if the service is properly declared. Intent intent = new Intent(VpnConfig.SERVICE_INTERFACE); intent.setClassName(mPackage, config.user); long token = Binder.clearCallingIdentity(); try { // Restricted users are not allowed to create VPNs, they are tied to Owner UserInfo user = mgr.getUserInfo(mUserHandle); if (user.isRestricted()) { thrownew SecurityException("Restricted users cannot establish VPNs"); }
ResolveInfo info = AppGlobals.getPackageManager().resolveService(intent, null, 0, mUserHandle); if (info == null) { thrownew SecurityException("Cannot find " + config.user); } if (!BIND_VPN_SERVICE.equals(info.serviceInfo.permission)) { thrownew SecurityException(config.user + " does not require " + BIND_VPN_SERVICE); } } catch (RemoteException e) { thrownew SecurityException("Cannot find " + config.user); } finally { Binder.restoreCallingIdentity(token); }
// Save the old config in case we need to go back. VpnConfig oldConfig = mConfig; String oldInterface = mInterface; Connection oldConnection = mConnection; NetworkAgent oldNetworkAgent = mNetworkAgent; Set<UidRange> oldUsers = mNetworkCapabilities.getUids();
// 调用jniCreate方法创建了一个FD // Configure the interface. Abort if any of these steps fails. ParcelFileDescriptor tun = ParcelFileDescriptor.adoptFd(jniCreate(config.mtu)); try { String interfaze = jniGetName(tun.getFd());
// TEMP use the old jni calls until there is support for netd address setting StringBuilder builder = new StringBuilder(); for (LinkAddress address : config.addresses) { builder.append(" "); builder.append(address); } if (jniSetAddresses(interfaze, builder.toString()) < 1) { thrownew IllegalArgumentException("At least one address must be specified"); } Connection connection = new Connection(); if (!mContext.bindServiceAsUser(intent, connection, Context.BIND_AUTO_CREATE | Context.BIND_FOREGROUND_SERVICE, new UserHandle(mUserHandle))) { thrownew IllegalStateException("Cannot bind " + config.user); }
mConnection = connection; mInterface = interfaze;
// Fill more values. config.user = mPackage; config.interfaze = mInterface; config.startTime = SystemClock.elapsedRealtime(); mConfig = config;
// Set up forwarding and DNS rules. // First attempt to do a seamless handover that only changes the interface name and // parameters. If that fails, disconnect. if (oldConfig != null && updateLinkPropertiesInPlaceIfPossible(mNetworkAgent, oldConfig)) { // Keep mNetworkAgent unchanged } else { mNetworkAgent = null; updateState(DetailedState.CONNECTING, "establish"); // Set up forwarding and DNS rules. agentConnect(); // Remove the old tun's user forwarding rules // The new tun's user rules have already been added above so they will take over // as rules are deleted. This prevents data leakage as the rules are moved over. agentDisconnect(oldNetworkAgent); }
if (oldConnection != null) { mContext.unbindService(oldConnection); }
if (oldInterface != null && !oldInterface.equals(interfaze)) { jniReset(oldInterface); }
try { IoUtils.setBlocking(tun.getFileDescriptor(), config.blocking); } catch (IOException e) { thrownew IllegalStateException( "Cannot set tunnel's fd as blocking=" + config.blocking, e); } } catch (RuntimeException e) { IoUtils.closeQuietly(tun); // If this is not seamless handover, disconnect partially-established network when error // occurs. if (oldNetworkAgent != mNetworkAgent) { agentDisconnect(); } // restore old state mConfig = oldConfig; mConnection = oldConnection; mNetworkCapabilities.setUids(oldUsers); mNetworkAgent = oldNetworkAgent; mInterface = oldInterface; throw e; } Log.i(TAG, "Established by " + config.user + " on " + mInterface); return tun; }
// Set MTU if it is specified. ifr4.ifr_mtu = mtu; if (mtu > 0 && ioctl(inet4, SIOCSIFMTU, &ifr4)) { ALOGE("Cannot set MTU on %s: %s", ifr4.ifr_name, strerror(errno)); goto error; }
tap/tun 是 Linux 内核 2.4.x 版本之后实现的虚拟网络设备,不同于物理网卡,tap/tun 虚拟网卡完全由软件来实现,功能和硬件实现完全没有差别,它们都属于网络设备,都可以配置 IP,都归 Linux 网络设备管理模块统一管理。 TAP 设备与 TUN 设备都是虚拟网络设备,工作方式完全相同,但它们的工作层次不太一样: