【Android】OkHttp源码分析

Android为我们提供了两种HTTP交互的方式:HttpURLConnection 和 Apache HttpClient,虽然两者都支持HTTPS,流的上传和下载,配置超时,IPv6和连接池,已足够满足我们各种HTTP请求的需求。但更高效的使用HTTP 可以让您的应用运行更快、更节省流量。而OkHttp库就是为此而生。在开始分析OkHttp之前我们先了解一下 HttpURLConnection 和 HttpClient 两者之间关系,以及它们和 OkHttp 之间的关系。

HttpClient vs HttpURLConnection

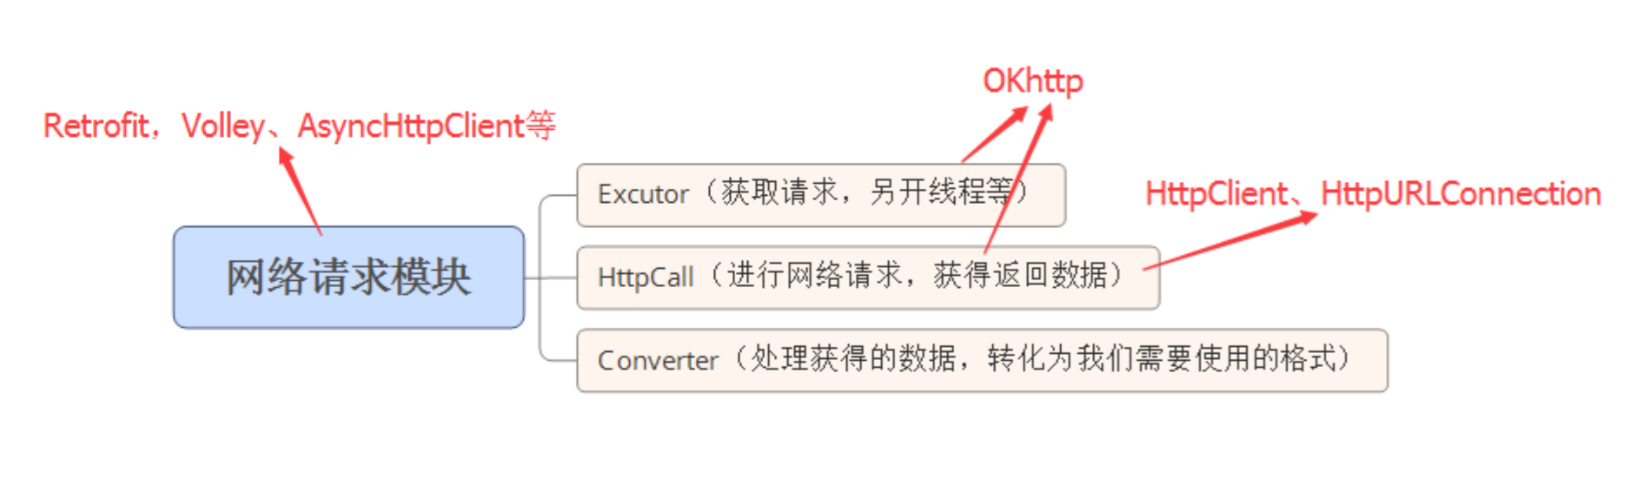
在Android API Level 9(Android 2.2)之前只能使用HttpClient类发送http请求。HttpClient是Apache用于发送http请求的客户端,其提供了强大的API支持,而且基本没有什么bug,但是由于其太过复杂,Android团队在保持向后兼容的情况下,很难对DefaultHttpClient进行增强。为此,Android团队从Android API Level 9开始自己实现了一个发送http请求的客户端类 —— HttpURLConnection

相比于DefaultHttpClientHttpURLConnection比较轻量级,虽然功能没有DefaultHttpClient那么强大,但是能够满足大部分的需求,所以Android推荐使用HttpURLConnection代替DefaultHttpClient,并不强制使用HttpURLConnection

但从Android API Level 23(Android 6.0)开始,不能再在Android中使用HttpClient,强制使用HttpURLConnection。参考官网:Android 6.0 Changes - Google Developer

Android 6.0 版移除了对 Apache HTTP client的支持。如果您的应用使用该客户端,并以 Android 2.3(API level 9)或更高版本为目标平台,请改用 HttpURLConnection 类。此 API 效率更高,因为它可以通过透明压缩和响应缓存减少网络使用,并可最大限度降低耗电量。要继续使用 Apache HTTP API,您必须先在 build.gradle 文件中声明以下编译时依赖项:

1
2
3
android {
useLibrary 'org.apache.http.legacy'
}

二者对比

  • HttpURLConnection

    在Android2.2之前:HttpURLConnection 有个重大 Bug:调用 close() 函数会影响连接池,导致连接复用失效;所以Android2.2之前不建议使用HttpURLConnection。在Android2.2之后:HttpURLConnection默认开启了 gzip 压缩&提高了HTTPS 的性能

  • HttpClient

    优点:相比于HttpURLConnection,更加高效简洁
    缺点:结构过于复杂;维护成本高

    在5.0版本后被Android官方弃用

尽管Google在大部分安卓版本中推荐使用HttpURLConnection,但是这个类相比HttpClient实在是太难用,太弱爆了。OkHttp是一个相对成熟的解决方案,我们跟踪这篇文章:Android HttpURLConnection源码分析。就会发现Android4.4之后的HttpURLConnection其实是基于OkHttp实现的。所以我们更有理由相信OkHttp的强大。

二者与网络请求库之间的关系

网络请求框架本质上是一个将网络请求的相关方法( HttpClient或HttpURLConnection)封装好的类库,并实现另开线程进行请求和处理数据,从而实现整个网络请求模块的功能。具体的关系可看下图:

OkHttp是基于http协议封装的一套请求客户端,虽然它也可以开线程,但根本上它更偏向真正的请求,跟HttpClientHttpUrlConnection的职责是一样的。

OkHttp简介

OkHttp 库的设计和实现的首要目标是高效。这也是选择 OkHttp 的重要理由之一。OkHttp 提供了对最新的 HTTP 协议版本 HTTP/2 和 SPDY 的支持,这使得对同一个主机发出的所有请求都可以共享相同的Socket连接。如果 HTTP/2 和 SPDY 不可用,OkHttp 会使用连接池来复用连接以提高效率。OkHttp 提供了对 GZIP 的默认支持来降低传输内容的大小。OkHttp 也提供了对 HTTP 响应的缓存机制,可以避免不必要的网络请求。当网络出现问题时,OkHttp 会自动重试一个主机的多个 IP 地址。

OkHttp是一个高效的HTTP库:

  • 支持 HTTP/2和SPDY ,共享同一个Socket来处理同一个服务器的所有请求
  • 如果 HTTP/2和SPDY 不可用,则通过连接池来减少请求延时
  • 无缝的支持GZIP来减少数据流量
  • 缓存响应数据来减少重复的网络请求

如何使用

OkHttp的使用是比较简单的,整体步骤是:

  1. 初始化 OkHttpClient
  2. 初始化一个 Request
  3. 由 OkHttpClient 和 Request 生成一个 Call
  4. Call 调用 enqueue (异步)或者 execute 方法(同步)

同步Get请求

这是OkHttp 最基本的 HTTP 请求,注意别放到UI线程执行。

1
2
3
4
5
6
7
8
9
10
11
12
13
14
15
16
17
18
19
20
21
22
23
24
25
26
27
public class SyncGet {
public static void main(String[] args) throws IOException {
//1. 初始化OkHttpClient
OkHttpClient client = new OkHttpClient();

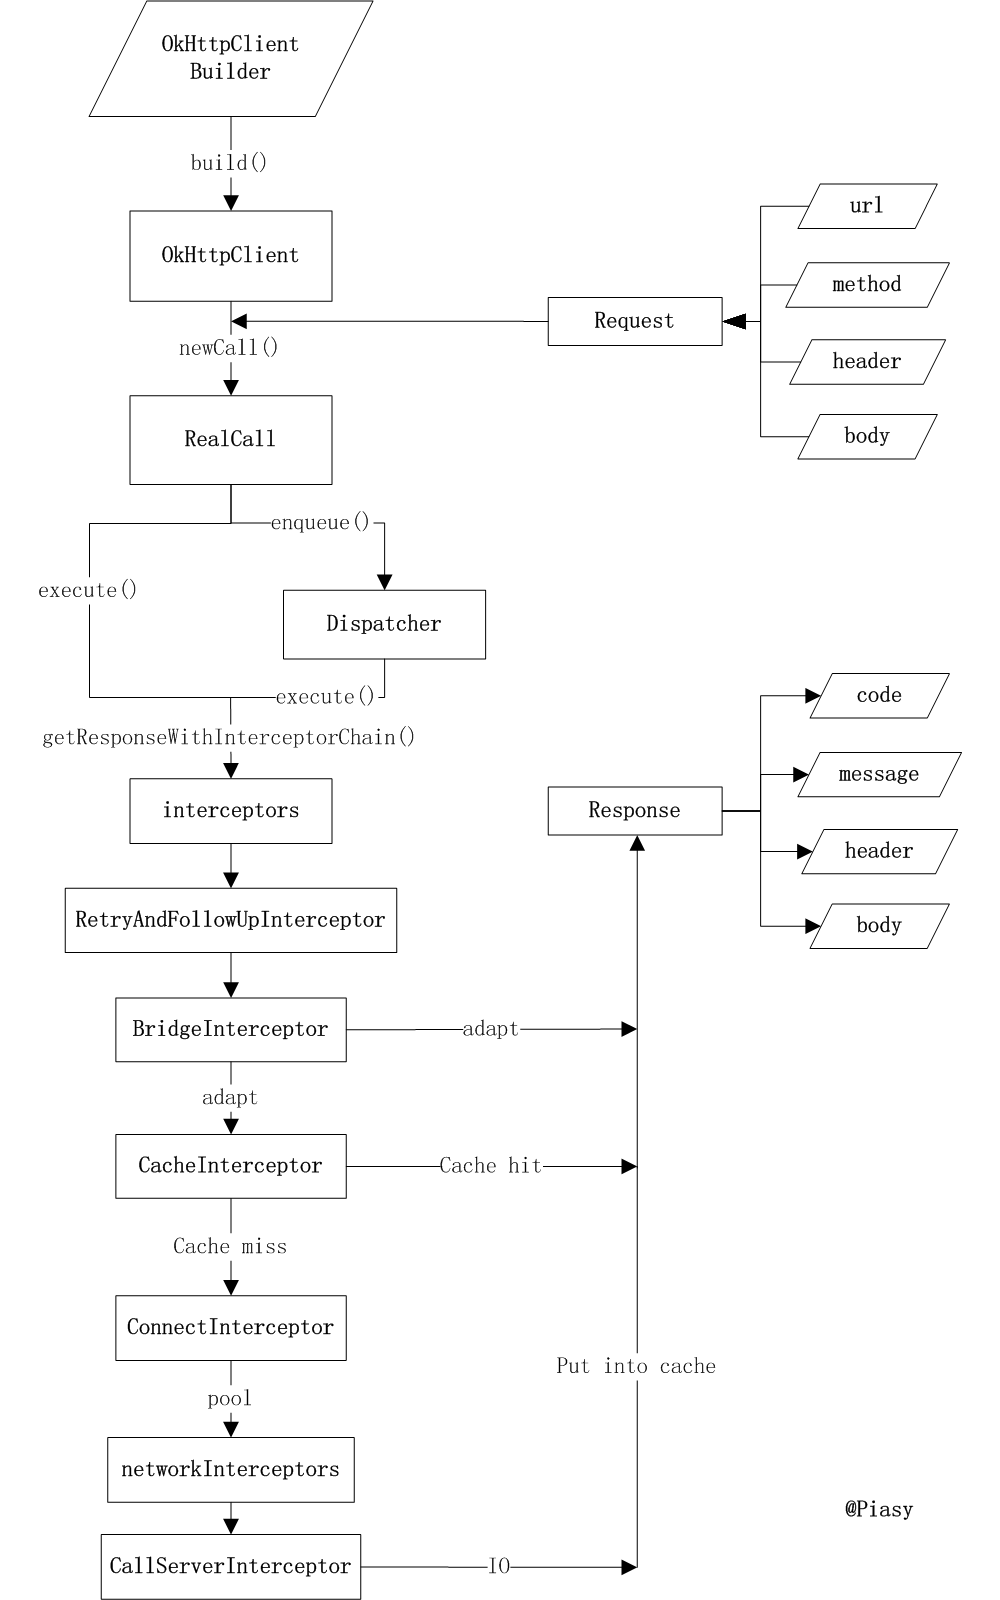
//2. 初始化一个Request
Request request = new Request.Builder()
.url("http://www.baidu.com")
.header("User-Agent", "My super agent")
.addHeader("Accept", "text/html")
.build();

//3. 由OkHttpClient和Request生成一个Call
//4. call调用enqueue或者execute
Response response = client.newCall(request).execute();
if (!response.isSuccessful()) {
throw new IOException("服务器端错误: " + response);
}

Headers responseHeaders = response.headers();
for (int i = 0; i < responseHeaders.size(); i++) {
System.out.println(responseHeaders.name(i) + ": " + responseHeaders.value(i));
}

System.out.println(response.body().string());
}
}

异步Get请求

1
2
3
4
5
6
7
8
9
10
11
12
13
14
15
16
17
18
19
20
21
22
23
24
public class AsyncGet {
public static void main(String[] args) throws IOException {
OkHttpClient client = new OkHttpClient();

Request request = new Request.Builder()
.url("http://www.baidu.com")
.build();

//Call 调用 enqueue 方法
client.newCall(request).enqueue(new Callback() {
public void onFailure(Request request, IOException e) {
e.printStackTrace();
}

public void onResponse(Response response) throws IOException {
if (!response.isSuccessful()) {
throw new IOException("服务器端错误: " + response);
}

System.out.println(response.body().string());
}
});
}
}

Post请求

HTTP POST 和 PUT 请求可以包含要提交的内容。只需要在创建 Request 对象时,通过 post()put() 方法来指定要提交的内容即可。下面的代码通过 RequestBodycreate() 方法来创建媒体类型为application/ json 的内容并提交。

1
2
3
4
5
6
7
8
9
10
11
12
13
public static final MediaType JSON = MediaType.parse("application/json; charset=utf-8");
OkHttpClient client = new OkHttpClient();

//post请求
public String post(String url, String json) throws IOException {
RequestBody body = RequestBody.create(JSON, json);
Request request = new Request.Builder()
.url(url)
.post(body)
.build();
Response response = client.newCall(request).execute();
return response.body().string();
}

具体的使用方法可以参考IBM的这篇文章:OkHttp:Java平台上的新一代HTTP客户端 ,下面我们转入源码的分析。

源码分析

我们从创建 OkHttpClient 对象开始:

1
OkHttpClient client = new OkHttpClient();

OkHttpClient

看看其构造函数:

1
2
3
public OkHttpClient() {
this(new Builder());
}

原来是方便我们使用,提供了一个“快捷操作”,全部使用了默认的配置。OkHttpClient.Builder 类成员很多,后面我们再慢慢分析,这里先暂时略过:

1
2
3
4
5
6
7
8
9
10
11
12
13
14
15
16
17
18
19
20
21
22
23
24
25
26
27
28
29
30
31
32
33
34
35
36
37
38
39
40
41
42
43
44
//OkHttpClient.java类中
OkHttpClient(Builder builder) {
this.dispatcher = builder.dispatcher; // 分发器
this.proxy = builder.proxy; // 代理
this.protocols = builder.protocols; // 协议
this.connectionSpecs = builder.connectionSpecs;
this.interceptors = Util.immutableList(builder.interceptors); // 拦截器
this.networkInterceptors = Util.immutableList(builder.networkInterceptors); // 网络拦截器
this.eventListenerFactory = builder.eventListenerFactory;
this.proxySelector = builder.proxySelector; // 代理选择
this.cookieJar = builder.cookieJar; // cookie
this.cache = builder.cache; // 缓存
this.internalCache = builder.internalCache;
this.socketFactory = builder.socketFactory;

boolean isTLS = false;
for (ConnectionSpec spec : connectionSpecs) {
isTLS = isTLS || spec.isTls();
}

if (builder.sslSocketFactory != null || !isTLS) {
this.sslSocketFactory = builder.sslSocketFactory;
this.certificateChainCleaner = builder.certificateChainCleaner;
} else {
X509TrustManager trustManager = systemDefaultTrustManager();
this.sslSocketFactory = systemDefaultSslSocketFactory(trustManager);
this.certificateChainCleaner = CertificateChainCleaner.get(trustManager);
}

this.hostnameVerifier = builder.hostnameVerifier;
this.certificatePinner = builder.certificatePinner.withCertificateChainCleaner(
certificateChainCleaner);
this.proxyAuthenticator = builder.proxyAuthenticator;
this.authenticator = builder.authenticator;
this.connectionPool = builder.connectionPool; // 连接复用池
this.dns = builder.dns;
this.followSslRedirects = builder.followSslRedirects;
this.followRedirects = builder.followRedirects;
this.retryOnConnectionFailure = builder.retryOnConnectionFailure;
this.connectTimeout = builder.connectTimeout; // 连接超时时间
this.readTimeout = builder.readTimeout; // 读取超时时间
this.writeTimeout = builder.writeTimeout; // 写入超时时间
this.pingInterval = builder.pingInterval;
}

看到这,如果你还不明白的话,也没关系,在OkHttp中只是设置用的的各个东西。

真正的流程要从里面的newCall()方法中说起,因为我们使用OkHttp发起 HTTP 请求的方式一般如下:

1
2
3
4
5
6
Request request = new Request.Builder()
.url("http://www.baidu.com")
.build();

//发起同步请求
Response response = client.newCall(request).execute();

当通过建造者模式创建了Request之后(这个没什么好说),紧接着就通过client.newCall(request).execute()来获得Response。这句代码就开启了整个GET请求的流程:

那我们现在就来看看它是如何通过newCall()创建 Call 的:

1
2
3
4
@Override 
public Call newCall(Request request) {
return RealCall.newRealCall(this, request, false /* for web socket */);
}

Call

在这里再多说一下关于Call这个类的作用,OkHttp 使用调用(Call)来对发送 HTTP 请求和获取响应的过程进行抽象。在Call中持有一个HttpEngine。每一个不同的Call都有自己独立的HttpEngine。在HttpEngine中主要是各种链路和地址的选择,还有一个Transport比较重要。Call接口定义如下:

1
2
3
4
5
6
7
8
9
10
11
12
13
14
15
16
17
18
19
20
public interface Call extends Cloneable {

Request request();

Response execute() throws IOException;

void enqueue(Callback responseCallback);

void cancel();

boolean isExecuted();

boolean isCanceled();

Call clone();

interface Factory {
Call newCall(Request request);
}
}

OkHttpClient 实现了 Call.Factory,负责根据请求创建新的 Call

CallFactory 负责创建 HTTP 请求,HTTP 请求被抽象为了 okhttp3.Call 类,它表示一个已经准备好,可以随时执行的 HTTP 请求

RealCall

RealCall是Call接口的实现,我们继续接着上面看RealCall的newRealCall()方法:

1
2
3
4
5
6
7
8
9
10
11
12
13
14
static RealCall newRealCall(OkHttpClient client, Request originalRequest, boolean forWebSocket) {
// Safely publish the Call instance to the EventListener.
RealCall call = new RealCall(client, originalRequest, forWebSocket);
call.eventListener = client.eventListenerFactory().create(call);
return call;
}


private RealCall(OkHttpClient client, Request originalRequest, boolean forWebSocket) {
this.client = client;
this.originalRequest = originalRequest;
this.forWebSocket = forWebSocket;
this.retryAndFollowUpInterceptor = new RetryAndFollowUpInterceptor(client, forWebSocket);
}

其实就是通过构造函数new了一个RealCall对象,构造函数如下,不用看很细,略过。我们重点看看 RealCall#execute

1
2
3
4
5
6
7
8
9
10
11
12
13
14
15
16
17
18
19
20
21
22
23
24
25
//RealCall类中
@Override
public Response execute() throws IOException {
synchronized (this) {
//1. 每个Call只能被执行一次。如果该 call 已经被执行过了,就设置 executed 为 true
if (executed) throw new IllegalStateException("Already Executed");
executed = true;
}
captureCallStackTrace();
eventListener.callStart(this);
try {
//2. 加入 runningSyncCalls 队列中
client.dispatcher().executed(this);
//3. 得到响应 result
Response result = getResponseWithInterceptorChain();
if (result == null) throw new IOException("Canceled");
return result;
} catch (IOException e) {
eventListener.callFailed(this, e);
throw e;
} finally {
//4. 从 runningSyncCalls 队列中移除
client.dispatcher().finished(this);
}
}

这里我们做了 4 件事:

  1. 检查这个 call 是否已经被执行了,每个 call 只能被执行一次,如果想要一个完全一样的 call,可以利用 call#clone 方法进行克隆。
  2. 利用 client.dispatcher().executed(this) 来进行实际执行,dispatcher 是刚才看到的 OkHttpClient.Builder 的成员之一,它的文档说自己是异步 HTTP 请求的执行策略,现在看来,同步请求它也有掺和。
  3. 调用 getResponseWithInterceptorChain() 函数获取 HTTP 返回结果,从函数名可以看出,这一步还会进行一系列“拦截”操作。
  4. 最后还要通知 dispatcher 自己已经执行完毕。

dispatcher 这里我们不过度关注,在同步执行的流程中,涉及到 dispatcher 的内容只不过是告知它我们的执行状态,比如开始执行了(调用 executed),比如执行完毕了(调用 finished),在异步执行流程中它会有更多的参与。

真正发出网络请求,解析返回结果的,还是 getResponseWithInterceptorChain。我们可以看到这方法是直接返回 Response 对象的,所以,在这个方法中一定做了很多很多的事情。

1
2
3
4
5
6
7
8
9
10
11
12
13
14
15
16
17
18
19
20
21
//RealCall类中
Response getResponseWithInterceptorChain() throws IOException {
// Build a full stack of interceptors.
List<Interceptor> interceptors = new ArrayList<>();
interceptors.addAll(client.interceptors()); // 加入用户自定义的拦截器
interceptors.add(retryAndFollowUpInterceptor); // 重试和重定向拦截器
interceptors.add(new BridgeInterceptor(client.cookieJar())); // 加入转化请求响应的拦截器
interceptors.add(new CacheInterceptor(client.internalCache())); // 加入缓存拦截器
interceptors.add(new ConnectInterceptor(client)); // 加入连接拦截器
if (!forWebSocket) {
interceptors.addAll(client.networkInterceptors()); // 加入用户自定义的网络拦截器
}
interceptors.add(new CallServerInterceptor(forWebSocket)); // 加入发出请求和读取响应的拦截器

Interceptor.Chain chain = new RealInterceptorChain(interceptors, null, null, null, 0,
originalRequest, this, eventListener, client.connectTimeoutMillis(),
client.readTimeoutMillis(), client.writeTimeoutMillis());

// 利用 chain 来链式调用拦截器,最后的返回结果就是 Response 对象
return chain.proceed(originalRequest);
}

OkHttp 开发者之一介绍 OkHttp 的文章里面,作者讲到:

the whole thing is just a stack of built-in interceptors.

可见 Interceptor 是 OkHttp 最核心的一个东西,不要误以为它只负责拦截请求进行一些额外的处理(例如 cookie),实际上它把实际的网络请求、缓存、透明压缩等功能都统一了起来,每一个功能都只是一个 Interceptor,它们再连接成一个 Interceptor.Chain,环环相扣,最终圆满完成一次网络请求。

getResponseWithInterceptorChain 函数我们可以看到,Interceptor.Chain 的分布依次是:

  1. client.interceptors() ,首先加入 interceptors 的是用户自定义的拦截器,比如修改请求头的拦截器等;
  2. RetryAndFollowUpInterceptor :是用来重试和重定向的拦截器,在下面我们会讲到;
  3. BridgeInterceptor:是用来将用户友好的请求转化为向服务器的请求,之后又把服务器的响应转化为对用户友好的响应;
  4. CacheInterceptor:是缓存拦截器,若存在缓存并且可用就直接返回该缓存,否则会向服务器请求;
  5. ConnectInterceptor:用来建立连接的拦截器;
  6. client.networkInterceptors() 加入用户自定义的 networkInterceptors ;
  7. CallServerInterceptor:是真正向服务器发出请求且得到响应的拦截器;

在这里,位置决定了功能,最后一个 Interceptor 一定是负责和服务器实际通讯的,重定向、缓存等一定是在实际通讯之前的。

责任链模式在这个 Interceptor 链条中得到了很好的实践。

责任链模式面向对象程式设计里是一种软件设计模式,它包含了一些命令对象和一系列的处理对象。每一个处理对象决定它能处理哪些命令对象,它也知道如何将它不能处理的命令对象传递给该链中的下一个处理对象。该模式还描述了往该处理链的末尾添加新的处理对象的方法。

另外参考文章:Android设计模式之责任链模式中相关的分析:

Android中关于责任链模式比较明显的体现就是在事件分发过程中对事件的投递,其实严格来说,事件投递的模式并不是严格的责任链模式,但是其是责任链模式的一种变种体现。

对于把 Request 变成 Response 这件事来说,每个 Interceptor 都可能完成这件事,所以我们循着链条让每个 Interceptor 自行决定能否完成任务以及怎么完成任务(自力更生或者交给下一个 Interceptor)。这样一来,完成网络请求这件事就彻底从 RealCall 类中剥离了出来,简化了各自的责任和逻辑。

最后在聚合了这些拦截器之后,利用 RealInterceptorChain 来链式调用这些拦截器。

RealInterceptorChain

RealInterceptorChain 可以说是真正把这些拦截器串起来的一个角色。一个个拦截器就像一颗颗珠子,而 RealInterceptorChain就是把这些珠子串连起来的那根绳子。

进入 RealInterceptorChain ,主要是 proceed() 这个方法:

1
2
3
4
5
6
7
8
9
10
11
12
13
14
15
16
17
18
19
20
21
22
23
24
25
26
27
28
29
30
31
32
33
34
35
36
37
38
39
40
41
42
43
44
45
46
47
48
49
50
51
52
@Override 
public Response proceed(Request request) throws IOException {
return proceed(request, streamAllocation, httpCodec, connection);
}


public Response proceed(Request request, StreamAllocation streamAllocation, HttpCodec httpCodec,
RealConnection connection) throws IOException {
if (index >= interceptors.size()) throw new AssertionError();

calls++;

// If we already have a stream, confirm that the incoming request will use it.
if (this.httpCodec != null && !this.connection.supportsUrl(request.url())) {
throw new IllegalStateException("network interceptor " + interceptors.get(index - 1)
+ " must retain the same host and port");
}

// If we already have a stream, confirm that this is the only call to chain.proceed().
if (this.httpCodec != null && calls > 1) {
throw new IllegalStateException("network interceptor " + interceptors.get(index - 1)
+ " must call proceed() exactly once");
}

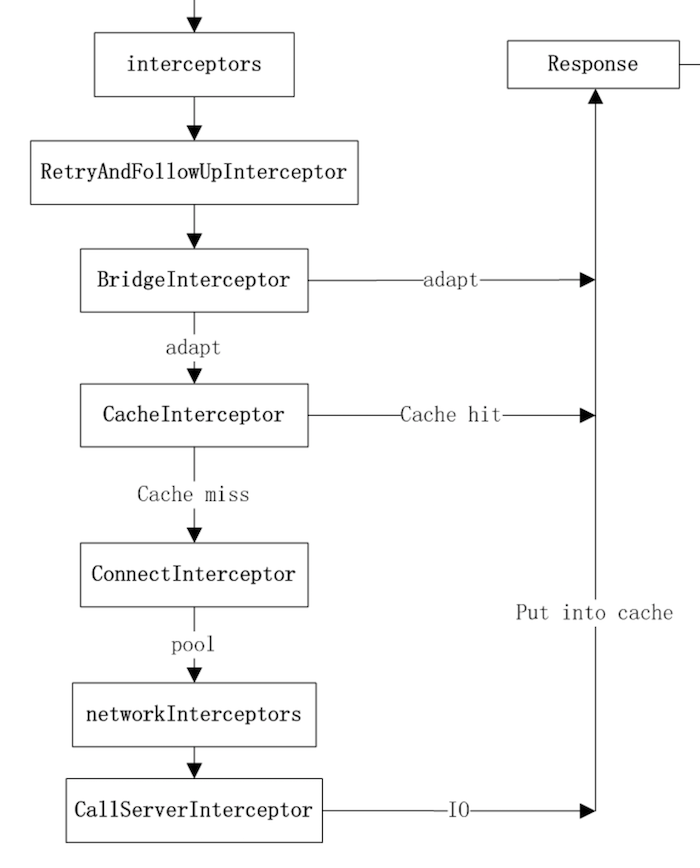
// 得到下一次对应的 RealInterceptorChain
// Call the next interceptor in the chain.
RealInterceptorChain next = new RealInterceptorChain(interceptors, streamAllocation, httpCodec,
connection, index + 1, request, call, eventListener, connectTimeout, readTimeout,
writeTimeout);
// 当前的 interceptor
Interceptor interceptor = interceptors.get(index);
// 进行拦截处理,并且在 interceptor 链式调用 next 的 proceed 方法
Response response = interceptor.intercept(next);

// Confirm that the next interceptor made its required call to chain.proceed().
if (httpCodec != null && index + 1 < interceptors.size() && next.calls != 1) {
throw new IllegalStateException("network interceptor " + interceptor
+ " must call proceed() exactly once");
}

// Confirm that the intercepted response isn't null.
if (response == null) {
throw new NullPointerException("interceptor " + interceptor + " returned null");
}

if (response.body() == null) {
throw new IllegalStateException(
"interceptor " + interceptor + " returned a response with no body");
}

return response;
}

在代码中是一次次链式调用拦截器,

  1. 下一个拦截器对应的RealIterceptorChain对象,这个对象会传递给当前的拦截器
  2. 得到当前的拦截器:interceptors是存放拦截器的ArryList
  3. 调用当前拦截器的intercept()方法,并将下一个拦截器的RealIterceptorChain对象传递下去

示意图如下:

下面根据上面的责任链我们逐个分析一下对应的拦截器Interceptor

拦截器Interceptor

拦截器是 OkHttp 提供的对 HTTP 请求和响应进行统一处理的强大机制。拦截器在实现和使用上类似于 Servlet 规范中的过滤器。多个拦截器可以链接起来,形成一个链条。拦截器会按照在链条上的顺序依次执行。 拦截器在执行时,可以先对请求的 Request 对象进行修改;再得到响应的 Response 对象之后,可以进行修改之后再返回。

拦截器Interceptor接口定义如下:

1
2
3
4
5
6
7
8
9
10
11
12
13
14
15
16
17
18
19
20
21
22
23
24
25
26
27
28
29
public interface Interceptor {
Response intercept(Chain chain) throws IOException;

interface Chain {
Request request();

Response proceed(Request request) throws IOException;

/**
* Returns the connection the request will be executed on. This is only available in the chains
* of network interceptors; for application interceptors this is always null.
*/
@Nullable Connection connection();

Call call();

int connectTimeoutMillis();

Chain withConnectTimeout(int timeout, TimeUnit unit);

int readTimeoutMillis();

Chain withReadTimeout(int timeout, TimeUnit unit);

int writeTimeoutMillis();

Chain withWriteTimeout(int timeout, TimeUnit unit);
}
}

除了在client中自定义设置的interceptor,第一个调用的就是RetryAndFollowUpInterceptor

RetryAndFollowUpInterceptor(重试和重定向拦截器)

我们着重看看它的intercept()方法:

1
2
3
4
5
6
7
8
9
10
11
12
13
14
15
16
17
18
19
20
21
22
23
24
25
26
27
28
29
30
31
32
33
34
35
36
37
38
39
40
41
42
43
44
45
46
47
48
49
50
51
52
53
54
55
56
57
58
59
60
61
62
63
64
65
66
67
68
69
70
71
72
73
74
75
76
77
78
79
80
81
82
83
84
85
86
87
88
89
90
91
92
93
94
95
96
97
98
@Override 
public Response intercept(Chain chain) throws IOException {
Request request = chain.request();
RealInterceptorChain realChain = (RealInterceptorChain) chain;
Call call = realChain.call();
EventListener eventListener = realChain.eventListener();

streamAllocation = new StreamAllocation(client.connectionPool(), createAddress(request.url()),
call, eventListener, callStackTrace);

int followUpCount = 0;
Response priorResponse = null;
while (true) {
// 如果取消,就释放资源
if (canceled) {
streamAllocation.release();
throw new IOException("Canceled");
}

Response response;
boolean releaseConnection = true;
try {
// 调用下一个拦截器
response = realChain.proceed(request, streamAllocation, null, null);
releaseConnection = false;
} catch (RouteException e) {
// The attempt to connect via a route failed. The request will not have been sent.
// 路由连接失败,请求将不会被发送
if (!recover(e.getLastConnectException(), false, request)) {
throw e.getLastConnectException();
}
releaseConnection = false;
continue;
} catch (IOException e) {
// An attempt to communicate with a server failed. The request may have been sent.
// 服务器连接失败,请求可能已被发送
boolean requestSendStarted = !(e instanceof ConnectionShutdownException);
if (!recover(e, requestSendStarted, request)) throw e;
releaseConnection = false;
continue;
} finally {
// We're throwing an unchecked exception. Release any resources.
// 抛出未检查的异常,释放资源
if (releaseConnection) {
streamAllocation.streamFailed(null);
streamAllocation.release();
}
}

// Attach the prior response if it exists. Such responses never have a body.
if (priorResponse != null) {
response = response.newBuilder()
.priorResponse(priorResponse.newBuilder()
.body(null)
.build())
.build();
}

// 如果不需要重定向,那么 followUp 为空,会根据响应码判断
Request followUp = followUpRequest(response);

// 释放资源,返回 response
if (followUp == null) {
if (!forWebSocket) {
streamAllocation.release();
}
return response;
}

// 关闭 response 的 body
closeQuietly(response.body());

if (++followUpCount > MAX_FOLLOW_UPS) {
streamAllocation.release();
throw new ProtocolException("Too many follow-up requests: " + followUpCount);
}

if (followUp.body() instanceof UnrepeatableRequestBody) {
streamAllocation.release();
throw new HttpRetryException("Cannot retry streamed HTTP body", response.code());
}

// 比较response 和 followUp 是否为同一个连接
// 若为重定向就销毁旧连接,创建新连接
if (!sameConnection(response, followUp.url())) {
streamAllocation.release();
streamAllocation = new StreamAllocation(client.connectionPool(),
createAddress(followUp.url()), call, eventListener, callStackTrace);
} else if (streamAllocation.codec() != null) {
throw new IllegalStateException("Closing the body of " + response
+ " didn't close its backing stream. Bad interceptor?");
}

// 将重定向操作得到的新请求设置给 request
request = followUp;
priorResponse = response;
}
}

总体来说,RetryAndFollowUpInterceptor 是用来失败重试以及重定向的拦截器。

BridgeInterceptor(请求构造拦截器)

1
2
3
4
5
6
7
8
9
10
11
12
13
14
15
16
17
18
19
20
21
22
23
24
25
26
27
28
29
30
31
32
33
34
35
36
37
38
39
40
41
42
43
44
45
46
47
48
49
50
51
52
53
54
55
56
57
58
59
60
61
62
63
64
65
66
67
68
69
70
71
72
73
74
@Override 
public Response intercept(Chain chain) throws IOException {
Request userRequest = chain.request();
Request.Builder requestBuilder = userRequest.newBuilder();

// 将用户友好的 request 构造为发送给服务器的 request
RequestBody body = userRequest.body();
// 若有请求体,则构造
if (body != null) {
MediaType contentType = body.contentType();
if (contentType != null) {
requestBuilder.header("Content-Type", contentType.toString());
}

long contentLength = body.contentLength();
if (contentLength != -1) {
requestBuilder.header("Content-Length", Long.toString(contentLength));
requestBuilder.removeHeader("Transfer-Encoding");
} else {
requestBuilder.header("Transfer-Encoding", "chunked");
requestBuilder.removeHeader("Content-Length");
}
}

if (userRequest.header("Host") == null) {
requestBuilder.header("Host", hostHeader(userRequest.url(), false));
}

// Keep Alive
if (userRequest.header("Connection") == null) {
requestBuilder.header("Connection", "Keep-Alive");
}

// If we add an "Accept-Encoding: gzip" header field we're responsible for also decompressing
// the transfer stream.
// 使用 gzip 压缩
boolean transparentGzip = false;
if (userRequest.header("Accept-Encoding") == null && userRequest.header("Range") == null) {
transparentGzip = true;
requestBuilder.header("Accept-Encoding", "gzip");
}
// 设置 cookie
List<Cookie> cookies = cookieJar.loadForRequest(userRequest.url());
if (!cookies.isEmpty()) {
requestBuilder.header("Cookie", cookieHeader(cookies));
}
// UA: User-Agent
if (userRequest.header("User-Agent") == null) {
requestBuilder.header("User-Agent", Version.userAgent());
}
// 构造完后,将 request 交给下一个拦截器去处理。最后又得到服务端响应 networkResponse
Response networkResponse = chain.proceed(requestBuilder.build());
// 保存 networkResponse 的 cookie
HttpHeaders.receiveHeaders(cookieJar, userRequest.url(), networkResponse.headers());
// 将 networkResponse 转换为对用户友好的 response
Response.Builder responseBuilder = networkResponse.newBuilder()
.request(userRequest);

// 如果 networkResponse 使用 gzip 并且有响应体的话,给用户友好的 response 设置响应体
if (transparentGzip
&& "gzip".equalsIgnoreCase(networkResponse.header("Content-Encoding"))
&& HttpHeaders.hasBody(networkResponse)) {
GzipSource responseBody = new GzipSource(networkResponse.body().source());
Headers strippedHeaders = networkResponse.headers().newBuilder()
.removeAll("Content-Encoding")
.removeAll("Content-Length")
.build();
responseBuilder.headers(strippedHeaders);
String contentType = networkResponse.header("Content-Type");
responseBuilder.body(new RealResponseBody(contentType, -1L, Okio.buffer(responseBody)));
}

return responseBuilder.build();
}

BridgeInterceptor 这一步,

  • 先把用户友好的请求进行重新构造,变成了向服务器发送的请求。
  • 之后调用 chain.proceed(requestBuilder.build()) 进行下一个拦截器的处理。
  • 等到后面的拦截器都处理完毕,得到响应。再把 networkResponse 转化成对用户友好的 response

CacheInterceptor(缓存拦截器)

1
2
3
4
5
6
7
8
9
10
11
12
13
14
15
16
17
18
19
20
21
22
23
24
25
26
27
28
29
30
31
32
33
34
35
36
37
38
39
40
41
42
43
44
45
46
47
48
49
50
51
52
53
54
55
56
57
58
59
60
61
62
63
64
65
66
67
68
69
70
71
72
73
74
75
76
77
78
79
80
81
82
83
84
85
86
87
88
89
90
91
92
93
94
95
96
97
98
99
100
101
102
103
104
105
106
@Override 
public Response intercept(Chain chain) throws IOException {
// 尝试从缓存中查找 request 对应的 response
Response cacheCandidate = cache != null
? cache.get(chain.request())
: null;

// 获取当前时间,会和之前缓存的时间进行比较
long now = System.currentTimeMillis();

// 得到缓存策略
CacheStrategy strategy = new CacheStrategy.Factory(now, chain.request(), cacheCandidate).get();
Request networkRequest = strategy.networkRequest;
Response cacheResponse = strategy.cacheResponse;

// 追踪缓存,其实就是计数
if (cache != null) {
cache.trackResponse(strategy);
}

// 缓存未命中,关闭
if (cacheCandidate != null && cacheResponse == null) {
closeQuietly(cacheCandidate.body()); // The cache candidate wasn't applicable. Close it.
}

// If we're forbidden from using the network and the cache is insufficient, fail.
// 禁止网络并且没有缓存的话,返回失败
if (networkRequest == null && cacheResponse == null) {
return new Response.Builder()
.request(chain.request())
.protocol(Protocol.HTTP_1_1)
.code(504)
.message("Unsatisfiable Request (only-if-cached)")
.body(Util.EMPTY_RESPONSE)
.sentRequestAtMillis(-1L)
.receivedResponseAtMillis(System.currentTimeMillis())
.build();
}

// If we don't need the network, we're done.
// 命中缓存。且不需要网络请求更新,返回缓存
if (networkRequest == null) {
return cacheResponse.newBuilder()
.cacheResponse(stripBody(cacheResponse))
.build();
}

Response networkResponse = null;
try {
// 交给下一个拦截器,返回 networkResponse
networkResponse = chain.proceed(networkRequest);
} finally {
// If we're crashing on I/O or otherwise, don't leak the cache body.
if (networkResponse == null && cacheCandidate != null) {
closeQuietly(cacheCandidate.body());
}
}

// If we have a cache response too, then we're doing a conditional get.
// 如果我们同时有缓存和 networkResponse ,根据情况使用
if (cacheResponse != null) {
if (networkResponse.code() == HTTP_NOT_MODIFIED) {
Response response = cacheResponse.newBuilder()
.headers(combine(cacheResponse.headers(), networkResponse.headers()))
.sentRequestAtMillis(networkResponse.sentRequestAtMillis())
.receivedResponseAtMillis(networkResponse.receivedResponseAtMillis())
.cacheResponse(stripBody(cacheResponse))
.networkResponse(stripBody(networkResponse))
.build();
networkResponse.body().close();

// 更新原来的缓存至最新
// Update the cache after combining headers but before stripping the
// Content-Encoding header (as performed by initContentStream()).
cache.trackConditionalCacheHit();
cache.update(cacheResponse, response);
return response;
} else {
closeQuietly(cacheResponse.body());
}
}

Response response = networkResponse.newBuilder()
.cacheResponse(stripBody(cacheResponse))
.networkResponse(stripBody(networkResponse))
.build();

// 如果之前从未进行缓存,保存缓存
if (cache != null) {
if (HttpHeaders.hasBody(response) && CacheStrategy.isCacheable(response, networkRequest)) {
// Offer this request to the cache.
CacheRequest cacheRequest = cache.put(response);
return cacheWritingResponse(cacheRequest, response);
}

if (HttpMethod.invalidatesCache(networkRequest.method())) {
try {
cache.remove(networkRequest);
} catch (IOException ignored) {
// The cache cannot be written.
}
}
}

return response;
}

CacheInterceptor 做的事情就是根据请求拿到缓存,若没有缓存或者缓存失效,就进入网络请求阶段,否则会返回缓存。

ConnectInterceptor

1
2
3
4
5
6
7
8
9
10
11
12
13
14
15
@Override 
public Response intercept(Chain chain) throws IOException {
RealInterceptorChain realChain = (RealInterceptorChain) chain;
Request request = realChain.request();
StreamAllocation streamAllocation = realChain.streamAllocation();

// We need the network to satisfy this request. Possibly for validating a conditional GET.
boolean doExtensiveHealthChecks = !request.method().equals("GET");
// 创建 httpCodec (抽象类),分别对应着 http1.1 和 http 2
HttpCodec httpCodec = streamAllocation.newStream(client, chain, doExtensiveHealthChecks);
RealConnection connection = streamAllocation.connection();

// 交给下一个拦截器,得到返回的 Response
return realChain.proceed(request, streamAllocation, httpCodec, connection);
}

实际上建立连接就是调用了 streamAllocation.newStream 创建了一个 HttpCodec 对象,它将在后面的步骤中被使用,那它又是何方神圣呢?它是对 HTTP 协议操作的抽象,有两个实现:Http1CodecHttp2Codec,顾名思义,它们分别对应 HTTP/1.1 和 HTTP/2 版本的实现。

Http1Codec 中,它利用 OkioSocket 的读写操作进行封装,Okio 以后有机会再进行分析,现在让我们对它们保持一个简单地认识:它对 java.iojava.nio 进行了封装,让我们更便捷高效的进行 IO 操作。

而创建 HttpCodec 对象的过程涉及到 StreamAllocationRealConnection,代码较长,这里就不展开,这个过程概括来说,就是找到一个可用的 RealConnection,再利用 RealConnection 的输入输出(BufferedSourceBufferedSink)创建 HttpCodec 对象,供后续步骤使用。

我们来看下 streamAllocation.newStream() 的代码:

1
2
3
4
5
6
7
8
9
10
11
12
13
14
15
16
17
18
19
20
21
22
// 位于StreamAllocation类
public HttpCodec newStream(
OkHttpClient client, Interceptor.Chain chain, boolean doExtensiveHealthChecks) {
int connectTimeout = chain.connectTimeoutMillis();
int readTimeout = chain.readTimeoutMillis();
int writeTimeout = chain.writeTimeoutMillis();
boolean connectionRetryEnabled = client.retryOnConnectionFailure();

try {
// 在连接池中找到一个可用的连接,然后创建出 HttpCodec 对象
RealConnection resultConnection = findHealthyConnection(connectTimeout, readTimeout,
writeTimeout, connectionRetryEnabled, doExtensiveHealthChecks);
HttpCodec resultCodec = resultConnection.newCodec(client, chain, this);

synchronized (connectionPool) {
codec = resultCodec;
return resultCodec;
}
} catch (IOException e) {
throw new RouteException(e);
}
}
  • findHealthyConnection():先在连接池中找到可用的连接 resultConnection
    这一步会使用Platform.get().connectSocket()创建TCP连接,完成三次握手。
  • resultConnection.newCodec():再结合 sinksource 创建出 HttpCodec 的对象。

    HttpCodec 负责对HTTP请求和响应进行编解码。注释如下:

1
2
/** Encodes HTTP requests and decodes HTTP responses. */
public interface HttpCodec { ... }

CallServerInterceptor

1
2
3
4
5
6
7
8
9
10
11
12
13
14
15
16
17
18
19
20
21
22
23
24
25
26
27
28
29
30
31
32
33
34
35
36
37
38
39
40
41
42
43
44
45
46
47
48
49
50
51
52
53
54
55
56
57
58
59
60
61
62
63
64
65
66
67
68
69
70
71
72
73
74
75
76
77
78
79
80
81
82
83
84
85
86
87
88
89
90
91
92
93
94
95
@Override 
public Response intercept(Chain chain) throws IOException {
RealInterceptorChain realChain = (RealInterceptorChain) chain;
HttpCodec httpCodec = realChain.httpStream();
StreamAllocation streamAllocation = realChain.streamAllocation();
RealConnection connection = (RealConnection) realChain.connection();
Request request = realChain.request();

long sentRequestMillis = System.currentTimeMillis();

realChain.eventListener().requestHeadersStart(realChain.call());
// 整理请求头并写入
httpCodec.writeRequestHeaders(request);
realChain.eventListener().requestHeadersEnd(realChain.call(), request);

Response.Builder responseBuilder = null;
// 检查是否为有 body 的请求方法
if (HttpMethod.permitsRequestBody(request.method()) && request.body() != null) {
// If there's a "Expect: 100-continue" header on the request, wait for a "HTTP/1.1 100
// Continue" response before transmitting the request body. If we don't get that, return
// what we did get (such as a 4xx response) without ever transmitting the request body.
if ("100-continue".equalsIgnoreCase(request.header("Expect"))) {
httpCodec.flushRequest();
realChain.eventListener().responseHeadersStart(realChain.call());
responseBuilder = httpCodec.readResponseHeaders(true);
}

if (responseBuilder == null) {
// Write the request body if the "Expect: 100-continue" expectation was met.
// 写入请求体 request body
realChain.eventListener().requestBodyStart(realChain.call());
long contentLength = request.body().contentLength();
CountingSink requestBodyOut =
new CountingSink(httpCodec.createRequestBody(request, contentLength));
BufferedSink bufferedRequestBody = Okio.buffer(requestBodyOut);

request.body().writeTo(bufferedRequestBody);
bufferedRequestBody.close();
realChain.eventListener()
.requestBodyEnd(realChain.call(), requestBodyOut.successfulCount);
} else if (!connection.isMultiplexed()) {
// If the "Expect: 100-continue" expectation wasn't met, prevent the HTTP/1 connection
// from being reused. Otherwise we're still obligated to transmit the request body to
// leave the connection in a consistent state.
streamAllocation.noNewStreams();
}
}

httpCodec.finishRequest();

// 得到响应头
if (responseBuilder == null) {
realChain.eventListener().responseHeadersStart(realChain.call());
responseBuilder = httpCodec.readResponseHeaders(false);
}

// 构造 response
Response response = responseBuilder
.request(request)
.handshake(streamAllocation.connection().handshake())
.sentRequestAtMillis(sentRequestMillis)
.receivedResponseAtMillis(System.currentTimeMillis())
.build();

realChain.eventListener()
.responseHeadersEnd(realChain.call(), response);

int code = response.code();
// 如果为 web socket 且状态码是 101 ,那么 body 为空
if (forWebSocket && code == 101) {
// Connection is upgrading, but we need to ensure interceptors see a non-null response body.
response = response.newBuilder()
.body(Util.EMPTY_RESPONSE)
.build();
} else {
// 读取 body
response = response.newBuilder()
.body(httpCodec.openResponseBody(response))
.build();
}

// 如果请求头中有 close 那么断开连接
if ("close".equalsIgnoreCase(response.request().header("Connection"))
|| "close".equalsIgnoreCase(response.header("Connection"))) {
streamAllocation.noNewStreams();
}

// 抛出协议异常
if ((code == 204 || code == 205) && response.body().contentLength() > 0) {
throw new ProtocolException(
"HTTP " + code + " had non-zero Content-Length: " + response.body().contentLength());
}

return response;
}

CallServerInterceptor 中可见,关于请求和响应部分都是通过 HttpCodec 来实现的。而在 HttpCodec 内部又是通过 sinksource 来实现的。所以说到底还是 IO 流在起作用。

上面的流程我们抓住主干部分:

  1. 向服务器发送 request header;
  2. 如果有 request body,就向服务器发送;
  3. 读取 response header,先构造一个 Response 对象;
  4. 如果有 response body,就在 3 的基础上加上 body 构造一个新的 Response 对象;

这里我们可以看到,核心工作都由 HttpCodec 对象完成,而 HttpCodec 实际上利用的是 Okio,而 Okio 实际上还是用的 Socket,所以没什么神秘的,只不过一层套一层,层数有点多。

小结

其实 Interceptor 的设计也是一种分层的思想,每个 Interceptor 就是一层。为什么要套这么多层呢?分层的思想在 TCP/IP 协议中就体现得淋漓尽致,分层简化了每一层的逻辑,每层只需要关注自己的责任(单一原则思想也在此体现),而各层之间通过约定的接口/协议进行合作(面向接口编程思想),共同完成复杂的任务。

到这里,我们也完全明白了 OkHttp 中的分层思想,每一个 interceptor 只处理自己的事,而剩余的就交给其他的 interceptor 。这种思想可以简化一些繁琐复杂的流程,从而达到逻辑清晰、互不干扰的效果。

异步请求

与同步请求直接调用RealCallexecute() 方法不同的是,异步请求是调用了 enqueue(Callback responseCallback) 这个方法。那么我们对异步请求探究的入口就是 enqueue(Callback responseCallback) 了。

RealCall

1
2
3
4
5
6
7
8
9
10
11
@Override
public void enqueue(Callback responseCallback) {
synchronized (this) {
if (executed) throw new IllegalStateException("Already Executed");
executed = true;
}
captureCallStackTrace();
eventListener.callStart(this);
// 加入到 dispatcher 中,这里包装成了 AsyncCall
client.dispatcher().enqueue(new AsyncCall(responseCallback));
}

主要的方法就是调用了 Dispatcherenqueue(AsyncCall call) 方法。这里需要注意的是,传入的是 AsyncCall 对象,而不是同步中的 RealCall

Dispatcher

我们跟进到 Dispatcher 的源码,至于 AsyncCall 我们会在下面详细讲到。

1
2
3
4
5
6
7
8
9
10
11
12
13
14
15
16
17
18
19
20
21
22
23
synchronized void enqueue(AsyncCall call) {
// 如果当前正在运行的异步 call 数 < 64 && 队列中请求同一个 host 的异步 call 数 < 5
// maxRequests = 64,maxRequestsPerHost = 5
if (runningAsyncCalls.size() < maxRequests && runningCallsForHost(call) < maxRequestsPerHost) {
// 加入正在运行异步队列
runningAsyncCalls.add(call);
// 加入到线程池中
executorService().execute(call);
} else {
// 加入预备等待的异步队列
readyAsyncCalls.add(call);
}
}


// 创建线程池
public synchronized ExecutorService executorService() {
if (executorService == null) {
executorService = new ThreadPoolExecutor(0, Integer.MAX_VALUE, 60, TimeUnit.SECONDS,
new SynchronousQueue<Runnable>(), Util.threadFactory("OkHttp Dispatcher", false));
}
return executorService;
}

enqueue(AsyncCall call) 中可以知道,OkHttp 在运行中的异步请求数最多为 63 ,而同一个 host 的异步请求数最多为 4 。否则会加入到 readyAsyncCalls 中。

在加入到 runningAsyncCalls 后,就会进入线程池中被执行。到了这里,我们就要到 AsyncCall 中一探究竟了。

AsyncCall

AsyncCallRealCall类中的内部类,定义如下:

1
2
3
4
5
6
7
8
9
10
11
12
13
14
15
16
17
18
19
20
21
22
23
24
25
26
27
28
29
30
31
32
33
34
35
36
37
38
39
40
41
42
43
44
45
46
47
48
49
final class AsyncCall extends NamedRunnable {
private final Callback responseCallback;

AsyncCall(Callback responseCallback) {
super("OkHttp %s", redactedUrl());
this.responseCallback = responseCallback;
}

String host() {
return originalRequest.url().host();
}

Request request() {
return originalRequest;
}

RealCall get() {
return RealCall.this;
}

@Override protected void execute() {
boolean signalledCallback = false;
try {
// 调用一连串的拦截器,得到响应
Response response = getResponseWithInterceptorChain();
if (retryAndFollowUpInterceptor.isCanceled()) {
// 回调失败
signalledCallback = true;
responseCallback.onFailure(RealCall.this, new IOException("Canceled"));
} else {
// 回调结果
signalledCallback = true;
responseCallback.onResponse(RealCall.this, response);
}
} catch (IOException e) {
if (signalledCallback) {
// Do not signal the callback twice!
Platform.get().log(INFO, "Callback failure for " + toLoggableString(), e);
} else {
// 回调失败
eventListener.callFailed(RealCall.this, e);
responseCallback.onFailure(RealCall.this, e);
}
} finally {
// 在 runningAsyncCalls 中移除,并推进其他 call 的工作
client.dispatcher().finished(this);
}
}
}

AsyncCallexecute() 方法中,也是调用了 getResponseWithInterceptorChain() 方法来得到 Response 对象。从这里开始,就和同步请求的流程是一样的,就没必要讲了。

在得到 Response 后,进行结果的回调。最后,调用了 Dispatcherfinished 方法:

1
2
3
4
5
6
7
8
9
10
11
12
13
14
15
16
17
18
19
20
21
//Dispatcher类
void finished(RealCall.AsyncCall call) {
finished(runningAsyncCalls, call, true);
}

private <T> void finished(Deque<T> calls, T call, boolean promoteCalls) {
int runningCallsCount;
Runnable idleCallback;
synchronized (this) {
// 移除该 call
if (!calls.remove(call)) throw new AssertionError("Call wasn't in-flight!");
// 将 readyAsyncCalls 中的 call 移动到 runningAsyncCalls 中,并加入到线程池中
if (promoteCalls) promoteCalls();
runningCallsCount = runningCallsCount();
idleCallback = this.idleCallback;
}

if (runningCallsCount == 0 && idleCallback != null) {
idleCallback.run();
}
}

总结

OkHttp 作为一个简洁高效的 HTTP 客户端,可以在 Java 和 Android 程序中使用。相对于 Apache HttpClient 来说,OkHttp 的性能更好,其 API 设计也更加简单实用。

在文章最后我们再来回顾一下完整的流程图:

  • OkHttpClient 实现 Call.Factory,负责为 Request 创建 Call
  • RealCall 为具体的 Call 实现,其 enqueue() 异步接口通过 Dispatcher 利用 ExecutorService 实现,而最终进行网络请求时和同步 execute() 接口一致,都是通过 getResponseWithInterceptorChain() 函数实现;
  • getResponseWithInterceptorChain() 中利用 Interceptor 链条,分层实现重试重定向、缓存、透明压缩、网络 IO 等功能;

HTTP 连接

虽然在使用 OkHttp 发送 HTTP 请求时只需要提供 URL 即可,OkHttp 在实现中需要综合考虑 3 种不同的要素来确定与 HTTP 服务器之间实际建立的 HTTP 连接。这样做的目的是为了达到最佳的性能。

首先第一个考虑的要素是 URL 本身。URL 给出了要访问的资源的路径。比如 URL http://www.baidu.com 所对应的是百度首页的 HTTP 文档。在 URL 中比较重要的部分是访问时使用的模式,即 HTTP 还是 HTTPS。这会确定 OkHttp 所建立的是明文的 HTTP 连接,还是加密的 HTTPS 连接。

第二个要素是 HTTP 服务器的地址,如 baidu.com。每个地址都有对应的配置,包括端口号,HTTPS 连接设置和网络传输协议。同一个地址上的 URL 可以共享同一个底层 TCP 套接字连接。通过共享连接可以有显著的性能提升。OkHttp 提供了一个连接池来复用连接。

第三个要素是连接 HTTP 服务器时使用的路由。路由包括具体连接的 IP 地址(通过 DNS 查询来发现)和所使用的代理服务器。对于 HTTPS 连接还包括通讯协商时使用的 TLS 版本。对于同一个地址,可能有多个不同的路由。OkHttp 在遇到访问错误时会自动尝试备选路由。

当通过 OkHttp 来请求某个 URL 时,OkHttp 首先从 URL 中得到地址信息,再从连接池中根据地址来获取连接。如果在连接池中没有找到连接,则选择一个路由来尝试连接。尝试连接需要通过 DNS 查询来得到服务器的 IP 地址,也会用到代理服务器和 TLS 版本等信息。当实际的连接建立之后,OkHttp 发送 HTTP 请求并获取响应。当连接出现问题时,OkHttp 会自动选择另外的路由进行尝试。这使得 OkHttp 可以自动处理可能出现的网络问题。当成功获取到 HTTP 请求的响应之后,当前的连接会被放回到连接池中,提供给后续的请求来复用。连接池会定期把闲置的连接关闭以释放资源。

参考资料

Powered by Hexo and Hexo-theme-hiker

Copyright © 2013 - 2019 iTimeTraveler All Rights Reserved.

访客数 : | 访问量 :