
概述
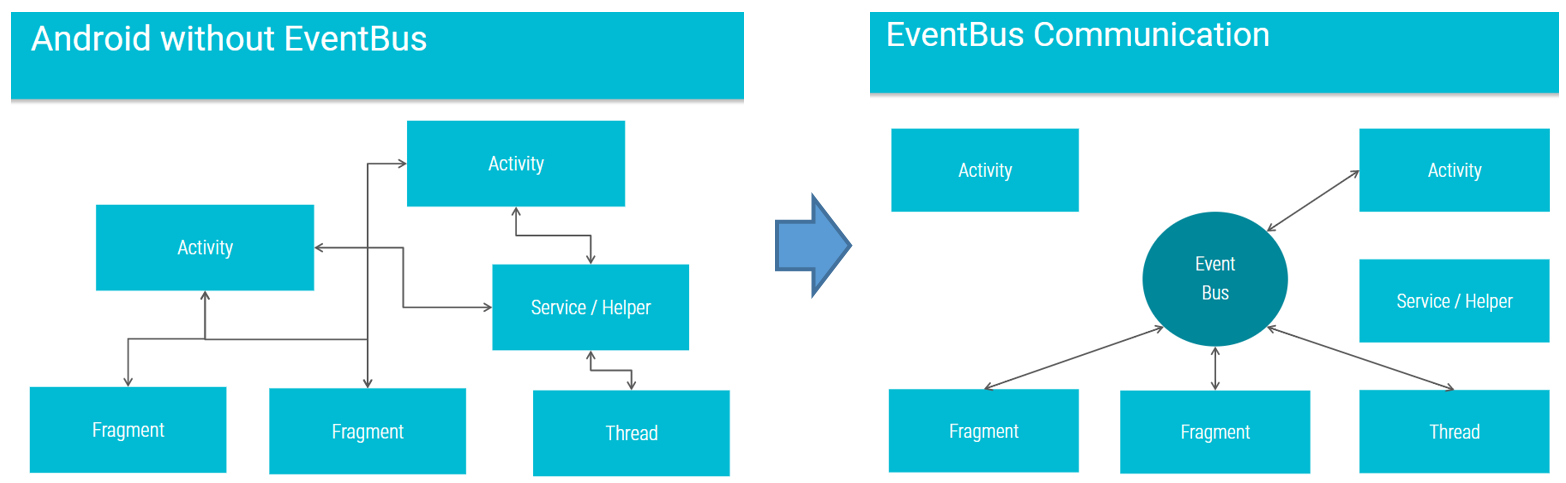
EventBus是Android中一个基于观察者模式的事件发布/订阅框架,开发者可以通过极少的代码去实现多个模块之间的通信,主要功能是替代Intent,Handler,BroadCast 在 Fragment,Activity,Service,线程Thread之间传递消息。优点是开销小,使用方便,可以很大程度上降低它们之间的耦合。 类似的库还有Otto ,今天就带大家一起研读 EventBus 的源码。
这是EventBus源码中的介绍:
1 | /** |
EventBus 是Android上的以发布\订阅事件为核心的库。事件 (
event) 通过post()发送到总线,然后再分发到匹配事件类型的订阅者 (subscribers) 。订阅者只有在总线中注册 (register) 了才能收到事件,注销 (unrigister) 之后就收不到任何事件了。事件方法必须带有Subscribe的注解,必须是public,没有返回类型void并且只能有一个参数。
EventBus3 与之前的相比,其主要差别在于订阅方法可以不再以onEvent 开头了,改为用注解。
一、使用EventBus

在Gradle中添加依赖
1 | compile 'org.greenrobot:eventbus:3.0.0' |
1.1 初始化
EventBus默认有一个单例,可以通过getDefault()获取,也可以通过EventBus.builder()构造自定义的EventBus,比如要应用我们生成好的索引时:
1 | EventBus mEventBus = EventBus.builder().addIndex(new MyEventBusIndex()).build(); |
如果想把自定义的设置应用到EventBus默认的单例中,则可以用installDefaultEventBus()方法:
1 | EventBus.builder().addIndex(new MyEventBusIndex()).installDefaultEventBus(); |
1.2 定义事件
所有能被实例化为Object的实例都可以作为事件:
1 | public class MessageEvent { |
在最新版的eventbus 3中如果用到了索引加速,事件类的修饰符必须为public,不然编译时会报错:Subscriber method must be public。
1.3 监听事件
订阅者需要在总线上注册和注销自己。只有当订阅者注册了才能接收到事件。在Android中,通常与 Activity 和 Fragment 的生命周期绑定在一起。
之前2.x版本中有四种注册方法,区分了普通注册和粘性事件注册,并且在注册时可以选择接收事件的优先级,这里我们就不对2.x版本做过多的研究了。由于3.0版本将粘性事件以及订阅事件的优先级换成了注解的实现方式,所以3.0版本中的注册就变得简单,只有一个register()方法即可。
1 | //3.0版本的注册 |
当我们不在需要接收事件的时候需要解除注册unregister,2.x和3.0的解除注册也是相同的。代码如下:
1 | //取消注册 |
接收到消息之后的处理方式,在2.x版本中,注册这些消息的监听需要区分是否监听黏性(sticky)事件,监听EventBus事件的模块需要实现以onEvent开头的方法。如今3.0改为在方法上添加注解的形式:
1 | //3.0版本 |
在2.x版本中只有通过onEvent开头的方法会被注册,而且响应事件方法触发的线程通过onEventMainThread或onEventBackgroundThread这些方法名区分,而在3.0版本中,通过@Subscribe注解,来确定运行的线程threadMode,是否接受粘性事件sticky以及事件优先级priority,而且方法名不在需要onEvent开头,所以又简洁灵活了不少。
我们可以看到注解@Subscribe有三个参数,threadMode为回调所在的线程,priority为优先级,sticky为是否接收黏性事件。调度单位从类细化到了方法,对方法的命名也没有了要求,方便混淆代码。但注册了监听的模块必须有一个标注了Subscribe注解方法,不然在register时会抛出异常:
1 | Subscriber class XXX and its super classes have no public methods with the @Subscribe annotation |
1.4 发送事件
可以从代码的任何地方调用post或者postSticky发送事件,此时注册了的且匹配事件的订阅者能够接收到事件。
1 | EventBus.getDefault().post(new MessageEvent("Hello everyone!")); |
在实际项目的使用中,register和unregister通常与Activity和Fragment的生命周期相关,ThreadMode.MainThread可以很好地解决Android的界面刷新必须在UI线程的问题,不需要再回调后用Handler中转(EventBus中已经自动用Handler做了处理),黏性事件可以很好地解决post与register同时执行时的异步问题(这个在原理中会说到),事件的传递也没有序列化与反序列化的性能消耗,足以满足我们大部分情况下的模块间通信需求。
二、EventBus源码跟踪
我们通过EventBus的使用流程来跟踪分析它的调用流程,通过我们熟悉的使用方法来深入到EventBus的实现内部并理解它的实现原理。
2.1 创建EventBus对象
先看看 getDefault() :
1 | static volatile EventBus defaultInstance; |
这里就是设计模式里我们常用的单例模式,用到了double check。保证了getDefault()得到的都是同一个实例。如果不存在实例,就调用了EventBus的构造方法:
1 | /** |
什么,既然是单例模式构造函数还是 public ?没错,这样的设计是因为不仅仅可以只有一条总线,还可以有其他的线 (bus) ,订阅者可以注册到不同的线上的 EventBus,通过不同的 EventBus 实例来发送数据,不同的 EventBus 是相互隔离开的,订阅者都只会收到注册到该线上事件。
然后我们说一下构造函数里这三个 HasMap。
subscriptionsByEventType是以event为 key,subscriber列表为 value,当发送event的时候,都是去这里找对应的订阅者。typesBySubscriber是以subscriber为 key,event列表为 value,当register()和unregister()的时候都是操作这个map,同时对subscriptionsByEventType进行对用操作。stickyEvents维护的是粘性事件,粘性事件也就是当event发送出去之后再注册粘性事件的话,该粘性事件也能收到之前发送出去的event。
同时构造函数中还创建了 3 个 poster :HandlerPoster ,BackgroundPoster和AsyncPoster,这 3 个 poster 负责线程间调度,稍后的事件分发模块我们会详细讲到。我们接着看这个构造函数中,最终运用到了builder设计模式,那么来看看这个 EventBusBuilder 中有哪些参数:
1 | public class EventBusBuilder { |
可以看出是通过初始化了一个EventBusBuilder()对象来分别初始化EventBus的一些配置,注释里我标注了大部分比较重要的对象,这里没必要记住,看下面的文章时如果对某个对象不了解,可以再回来看看。
2.2 注册与订阅Register
EventBus 3.0的注册入口只提供一个register()方法了,所以我们先来看看register()方法做了什么:
1 | public void register(Object subscriber) { |
可以看到register()方法很简洁,代码里的注释也很清楚了,我们可以看出通过subscriberMethodFinder.findSubscriberMethods(subscriberClass)方法就能返回一个SubscriberMethod的对象,而SubscriberMethod里包含了所有我们需要的接下来执行subscribe()的信息。
那 SubscriberMethod里包含了什么呢?下面是它的变量和构造函数。可以看到里面包括订阅类里的具体执行方法Method对象,需要在哪个线程执行ThreadMode,事件类型eventType,优先级priority,以及是否接收粘性sticky事件。
1 | public class SubscriberMethod { |
然后我们去看看SubscriberMethodFinder类的findSubscriberMethods()是怎么找到订阅方法的,最后我们再去关注subscribe()。
SubscriberMethodFinder的实现
从字面理解,这个类就是订阅者方法发现者。一句话来描述SubscriberMethodFinder类就是用来查找和缓存订阅者响应函数的信息的类。所以我们首先要知道怎么能获得订阅者响应函数的相关信息。在3.0版本中,EventBus提供了一个EventBusAnnotationProcessor注解处理器来在编译期通过读取@Subscribe()注解并解析,处理其中所包含的信息,然后生成java类来保存所有订阅者关于订阅的信息,这样就比在运行时使用反射来获得这些订阅者的信息速度要快。我们可以参考EventBus项目里的EventBusPerformance这个例子,编译后我们可以在build文件夹里找到这个类,MyEventBusIndex 类,当然类名是可以自定义的。我们大致看一下生成的MyEventBusIndex类是什么样的:
1 | /** |
可以看出是使用一个静态HashMap即:SUBSCRIBER_INDEX来保存订阅类的信息,其中包括了订阅类的class对象,是否需要检查父类,以及订阅方法的信息SubscriberMethodInfo的数组,SubscriberMethodInfo中又保存了,订阅方法的方法名,订阅的事件类型,触发线程,是否接收sticky事件以及优先级priority。这其中就保存了register()的所有需要的信息,如果再配置EventBus的时候通过EventBusBuilder配置:eventBus = EventBus.builder().addIndex(new MyEventBusIndex()).build();来将编译生成的MyEventBusIndex配置进去,这样就能在SubscriberMethodFinder类中直接查找出订阅类的信息,就不需要再利用注解判断了,当然这种方法是作为EventBus的可选配置,SubscriberMethodFinder同样提供了通过注解来获得订阅类信息的方法,下面我们就来看findSubscriberMethods()到底是如何实现的:
1 | List<SubscriberMethod> findSubscriberMethods(Class<?> subscriberClass) { |
我们看看利用反射来读取订阅类中的订阅方法信息的函数:findUsingReflection()
1 | private List<SubscriberMethod> findUsingReflection(Class<?> subscriberClass) { |
以及从注解器生成的MyEventBusIndex类中获得订阅类的订阅方法信息: findUsingInfo():1
2
3
4
5
6
7
8
9
10
11
12
13
14
15
16
17
18
19
20
21
22
23private List<SubscriberMethod> findUsingInfo(Class<?> subscriberClass) {
FindState findState = prepareFindState();
findState.initForSubscriber(subscriberClass);
while (findState.clazz != null) {
//得到订阅者信息
findState.subscriberInfo = getSubscriberInfo(findState);
if (findState.subscriberInfo != null) {
//遍历订阅者方法
SubscriberMethod[] array = findState.subscriberInfo.getSubscriberMethods();
for (SubscriberMethod subscriberMethod : array) {
if (findState.checkAdd(subscriberMethod.method, subscriberMethod.eventType)) {
findState.subscriberMethods.add(subscriberMethod);
}
}
} else {
//如果没有订阅者信息就使用反射查找订阅方法
findUsingReflectionInSingleClass(findState);
}
//跳转到父类中继续查找
findState.moveToSuperclass();
}
return getMethodsAndRelease(findState);
}
进入到getSubscriberInfo() 方法中我们看到了从自定义索引Index获取订阅方法信息的操作:
1 | private SubscriberInfo getSubscriberInfo(FindState findState) { |
上面我们可以看到作者使用了FindState类来做订阅方法的校验和保存,并通过FIND_STATE_POOL静态数组来保存FindState对象,可以使FindState复用,避免重复创建过多的对象。最终是通过findUsingReflectionInSingleClass()来具体获得相关订阅方法的信息的:
1 | //在较新的类文件,编译器可能会添加方法。那些被称为BRIDGE或SYNTHETIC方法。EventBus必须忽略两者。有修饰符没有公开,但在Java类文件中有格式定义 |
关于 BRIDGE 和 SYNTHETIC ,注释写道:
In newer class files, compilers may add methods. Those are called bridge or synthetic methods. EventBus must ignore both. There modifiers are not public but defined in the Java class file format: http://docs.oracle.com/javase/specs/jvms/se7/html/jvms-4.html#jvms-4.6-200-A.1
在较新的类文件,编译器可能会添加方法。那些被称为 BRIDGE 或 SYNTHETIC 方法,EventBus 必须忽略两者。有修饰符没有公开,但在 Java 类文件中有格式定义。
该findUsingReflectionInSingleClass方法流程是:
- 拿到当前 class 的所有方法;
- 过滤掉不是 public 和是 abstract、static、bridge、synthetic 的方法;
- 过滤出方法参数只有一个的方法;
- 过滤出被Subscribe注解修饰的方法;
- 将 method 方法和 event 事件添加到
findState中; - 将 EventBus 关心的 method 方法、event 事件、threadMode、priority、sticky 封装成
SubscriberMethod对象添加到findState.subscriberMethods列表中;
这里走完,我们订阅类的所有SubscriberMethod都已经被保存了,最后再通过getMethodsAndRelease()返回List<SubscriberMethod>。至此,所有关于如何获得订阅类的订阅方法信息即:SubscriberMethod对象就已经完全分析完了,下面我们来看subscribe()是如何实现的。
subscribe()方法的实现
1 | //必须在同步代码块里调用 |
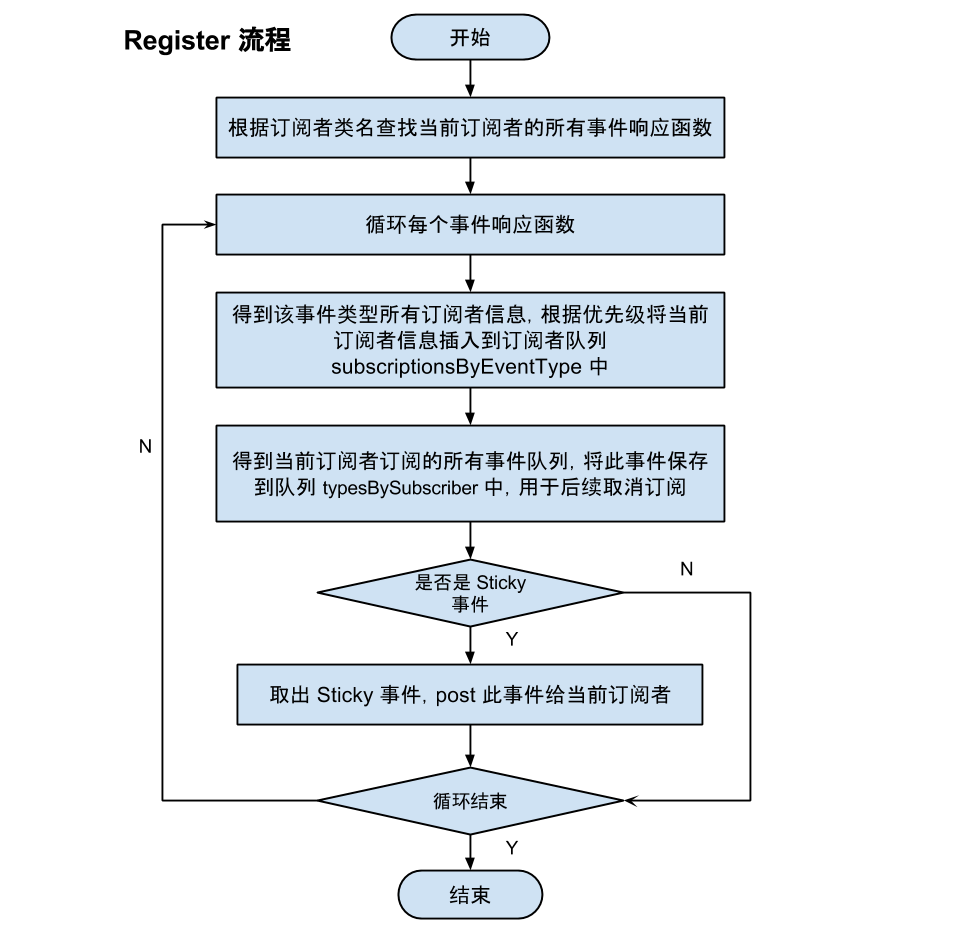
以上就是所有注册过程,现在再来看这张图就会特别清晰EventBus的register()过程了:
到这里,订阅流程就走完了。接下来我们在看事件分发的流程。
2.3 发送事件Post
我们知道发送事件是通过post() 方法进行广播的,比如第一节我们例子中提到的EventBus.getDefault().post(new MessageEvent("Hello everyone!")); 接下来我们进入这个post()方法一窥究竟:
1 | public void post(Object event) { |
首先是通过currentPostingThreadState.get()方法来得到当前线程PostingThreadState的对象,为什么是说当前线程?我们来看看currentPostingThreadState的实现:
1 | private final ThreadLocal<PostingThreadState> currentPostingThreadState = new ThreadLocal<PostingThreadState>() { |
其实现是返回一个 PostingThreadState 对象,而 PostingThreadState 类的结构如下,封装的是当前线程的 post 信息,包括事件队列、是否正在分发中、是否在主线程、订阅者信息、事件实例、是否取消。
1 | /** For ThreadLocal, much faster to set (and get multiple values). */ |
综上,currentPostingThreadState的实现是一个包含了PostingThreadState的ThreadLocal对象,关于ThreadLocal张涛的这篇文章解释的很好:ThreadLocal 是一个线程内部的数据存储类,通过它可以在指定的线程中存储数据,而这段数据是不会与其他线程共享的。 其内部原理是通过生成一个它包裹的泛型对象的数组,在不同的线程会有不同的数组索引值,通过这样就可以做到每个线程通过get() 方法获取的时候,取到的只能是自己线程所对应的数据。 所以这里取到的就是每个线程的PostingThreadState状态.接下来我们来看postSingleEvent():
1 | private void postSingleEvent(Object event, PostingThreadState postingState) throws Error { |
lookupAllEventTypes() 就是查找该事件的所有父类,返回所有的该事件的父类的 class 。它通过循环和递归一起用,将一个类的父类(接口)全部添加到全局静态变量 eventTypes 集合中。跟着上面的代码的注释,我们可以很清楚的发现是在postSingleEventForEventType()方法里去进行事件的分发,代码如下:
1 | private boolean postSingleEventForEventType(Object event, PostingThreadState postingState, Class<?> eventClass) { |
总结上面的代码就是,首先从subscriptionsByEventType里获得所有订阅了这个事件的Subscription列表,然后在通过postToSubscription()方法来分发事件,在postToSubscription()通过不同的threadMode在不同的线程里invoke()订阅者的方法,ThreadMode共有四类:
PostThread:默认的 ThreadMode,表示在执行 Post 操作的线程直接调用订阅者的事件响应方法,不论该线程是否为主线程(UI 线程)。当该线程为主线程时,响应方法中不能有耗时操作,否则有卡主线程的风险。适用场景:对于是否在主线程执行无要求,但若 Post 线程为主线程,不能耗时的操作;MainThread:在主线程中执行响应方法。如果发布线程就是主线程,则直接调用订阅者的事件响应方法,否则通过主线程的 Handler 发送消息在主线程中处理——调用订阅者的事件响应函数。显然,MainThread类的方法也不能有耗时操作,以避免卡主线程。适用场景:必须在主线程执行的操作;BackgroundThread:在后台线程中执行响应方法。如果发布线程不是主线程,则直接调用订阅者的事件响应函数,否则启动唯一的后台线程去处理。由于后台线程是唯一的,当事件超过一个的时候,它们会被放在队列中依次执行,因此该类响应方法虽然没有PostThread类和MainThread类方法对性能敏感,但最好不要有重度耗时的操作或太频繁的轻度耗时操作,以造成其他操作等待。适用场景:操作轻微耗时且不会过于频繁,即一般的耗时操作都可以放在这里;Async:不论发布线程是否为主线程,都使用一个空闲线程来处理。和BackgroundThread不同的是,Async类的所有线程是相互独立的,因此不会出现卡线程的问题。适用场景:长耗时操作,例如网络访问。
这里我们先看看invokeSubscriber(subscription, event);是如何实现的:
1 | void invokeSubscriber(Subscription subscription, Object event) { |
实际上就是通过反射调用了订阅者的订阅函数并把event对象作为参数传入。然后我们就又遇到了在EventBus构造函数中初始化的3个Poster:HandlerPoster(也就是代码中的mainThreadPoster对象) ,BackgroundPoster和AsyncPoster,这 3 个 poster 负责线程间调度。我们分别来看看:
# HandlerPoster
1 | final class HandlerPoster extends Handler { |
我们有必要回看EventBus的构造函数中初始化了mainThreadPoster = new HandlerPoster(this, Looper.getMainLooper(), 10);的代码。注意这行代码中传入的第二个参数Looper.getMainLooper()便指定了主线程的Looper,保证了这个HandlerPoster的运行在主线程。
然后PendingPost 的数据结构是这样的:
1 | final class PendingPost { |
其中 PendingPost 维护着一个可以复用PendingPost对象的复用池,通过 obtainPendingPost(Subscription, Object) 方法复用,通过 releasePendingPost(PendingPost ) 方法回收。
handleMessage() 中有一个死循环,这个死循环不停的从队列中拿数据,然后通过 EventBus.invokeSubscriber() 分发出去。每分发完一次比对一下时间,如果超过了 maxMillisInsideHandleMessage ,那么发送空 message再次进入到 handlerMessage 中且退出本次循环。
# BackgroundPoster
1 | /** |
同理 BackgroundPoster ,只不过 HandlerPoster 是在 handlerMessage 中进行分发操作,而 BackgroundPoster 是在 Runnable 的 run 方法中将所有队列中的消息取出进行分发,直到取完为止。
# AsyncPoster
1 | /** |
而 AsyncPoster 虽然也是在 Runnable 的 run 方法中取出队列中的消息,但是只取一个。不论发布线程是否为主线程,都使用一个空闲线程来处理。和BackgroundThread不同的是,Async类的所有线程是相互独立的,因此不会出现卡线程的问题。适用场景:长耗时操作,例如网络访问。
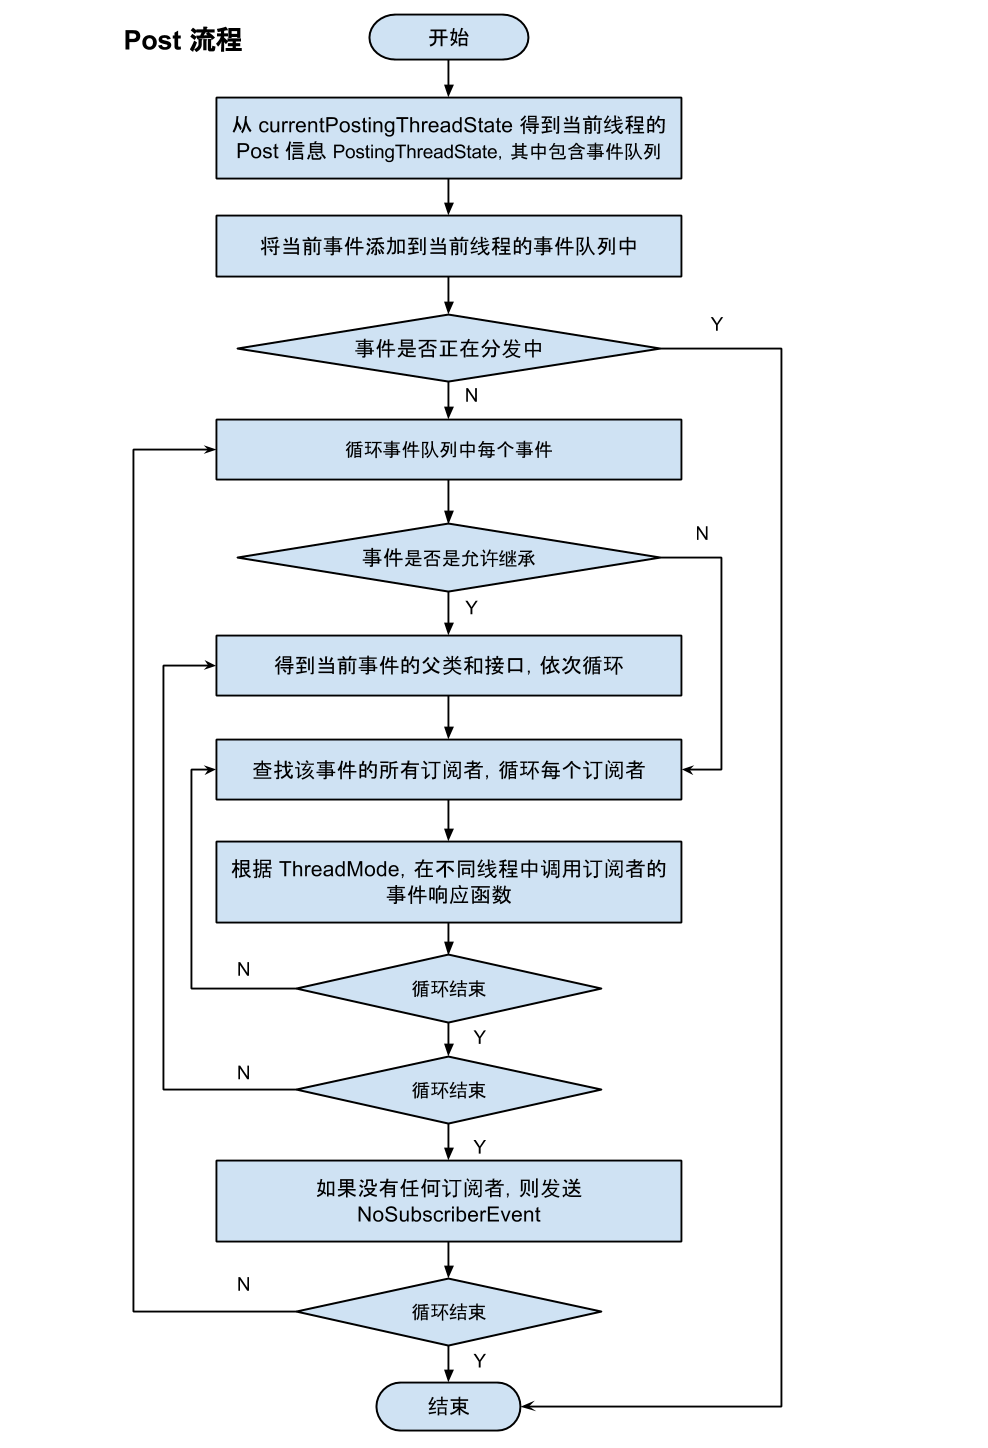
可以看到,不同的Poster会在post事件时,调度相应的事件队列PendingPostQueue,让每个订阅者的回调方法收到相应的事件,并在其注册的Thread中运行。而这个事件队列是一个链表,由一个个PendingPost组成,其中包含了事件,事件订阅者,回调方法这三个核心参数,以及需要执行的下一个PendingPost。至此post()流程就结束了,整体流程图如下:
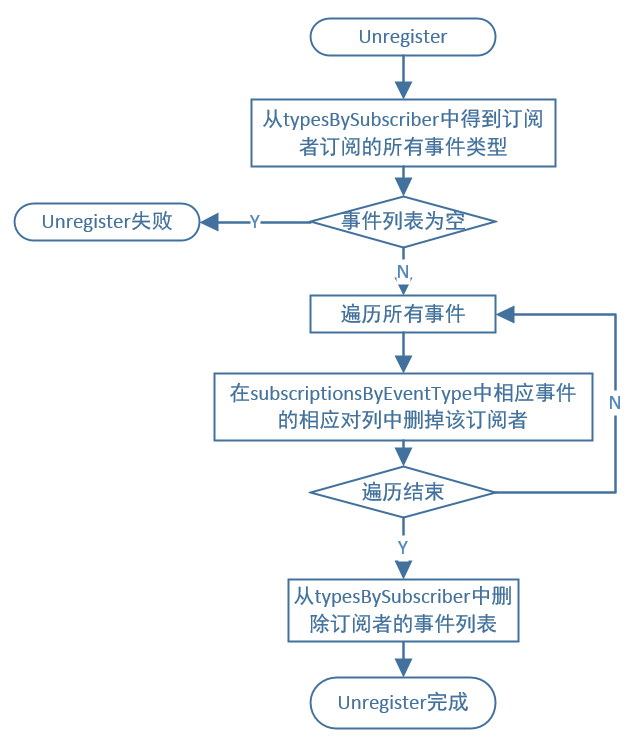
2.4 解除注册Unregister
看完了上面的分析,解除注册就相对容易了,解除注册只要调用unregister()方法即可。实现如下:
1 | public synchronized void unregister(Object subscriber) { |
然后接着看unsubscribeByEventType()方法的实现:
1 | private void unsubscribeByEventType(Object subscriber, Class<?> eventType) { |
最终分别从typesBySubscriber和subscriptions里分别移除订阅者以及相关信息即可。
2.5 注解Subscribe
最后我们来看一下EventBus中的这个Subscribe注解定义:
1 |
|
我们可以看到EventBus使用的这个注解Subscribe是运行时注解(RetentionPolicy.RUNTIME),为什么需要定义成运行时而不是编译时注解呢?我们先看一下三种不同时机的注解:
1 | /** |
@Retention定义了该Annotation被保留的时间长短:某些Annotation仅出现在源代码中,而被编译器丢弃;而另一些却被编译在class文件中;编译在class文件中的Annotation可能会被虚拟机忽略,而另一些在class被装载时将被读取(请注意并不影响class的执行,因为Annotation与class在使用上是被分离的)。
因为EventBus的register()方法中需要通过反射获得注册类中通过注解声明的订阅方法,也就意味着必须在运行时保留注解信息,以便能够反射得到这些方法。所以这个Subcribe注解必须是运行时注解。大家有疑惑的可以自己写个Demo尝试一下使用反射得到某个类中方法的编译时注解信息,一定会抛出NullPointerException异常。
三、EventBus原理分析
在平时使用中我们不需要关心EventBus中对事件的分发机制,但要成为能够快速排查问题的老司机,我们还是得熟悉它的工作原理,下面我们就透过UML图来学习一下。
3.1 核心架构
EventBus的核心工作机制透过作者Blog中的这张图就能很好地理解:
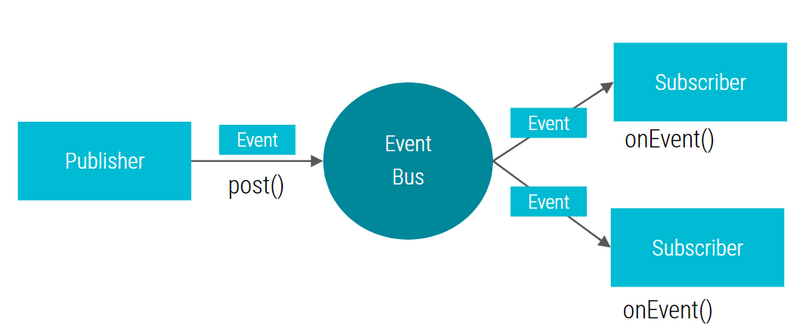
订阅者模块需要通过EventBus订阅相关的事件,并准备好处理事件的回调方法,而事件发布者则在适当的时机把事件post出去,EventBus就能帮我们搞定一切。在架构方面,EventBus 3.0与之前稍老版本有不同,我们直接看架构图:
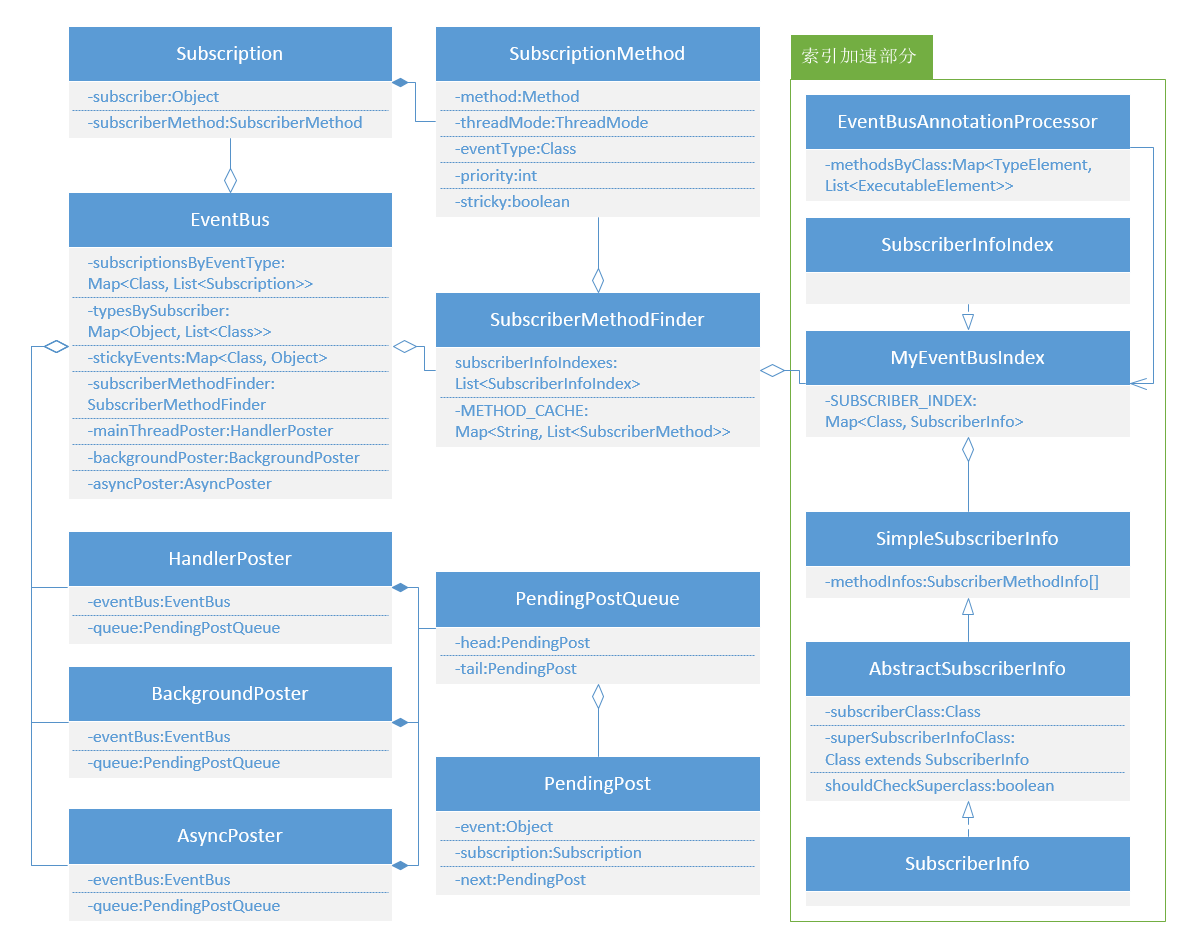
为了方便理解或者对比,顺便也放一张2.x老版本的结构图吧:
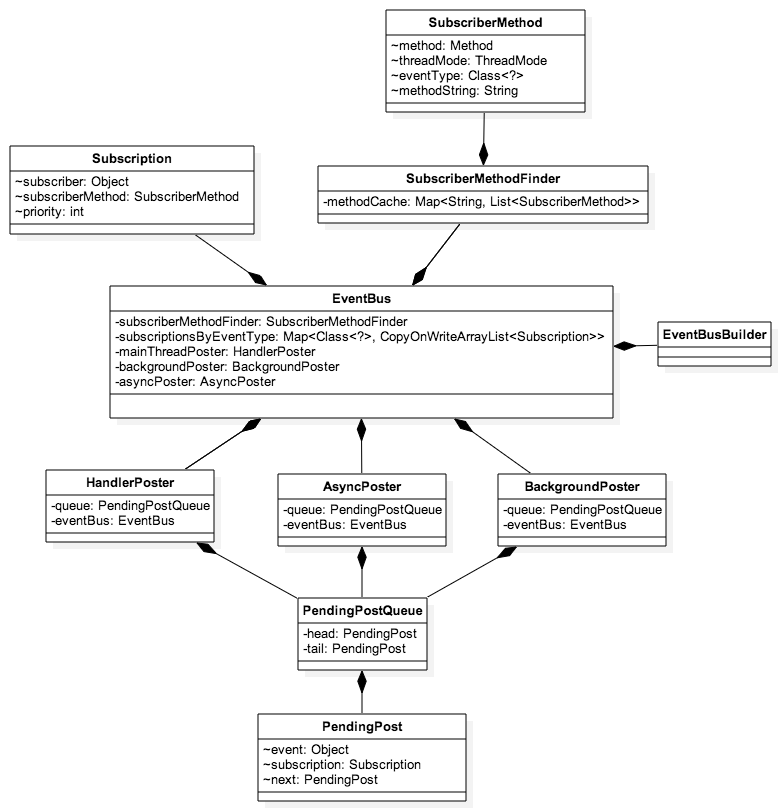
虽然更新了3.0,但是整体上的设计还是可以用上面的类图来分析,从类图上我们可以看到大部分类都是依赖于EventBus的,上部分主要是订阅者相关信息,中间是 EventBus 类,下面是发布者发布事件后的调用。
根据UML图,我们先看核心类EventBus,其中subscriptionByEventType是以事件的类为key,订阅者的回调方法为value的映射关系表。也就是说EventBus在收到一个事件时,就可以根据这个事件的类型,在subscriptionByEventType中找到所有监听了该事件的订阅者及处理事件的回调方法。而typesBySubscriber则是每个订阅者所监听的事件类型表,在取消注册时可以通过该表中保存的信息,快速删除subscriptionByEventType中订阅者的注册信息,避免遍历查找。注册事件、发送事件和注销都是围绕着这两个核心数据结构来展开。上面的Subscription可以理解为每个订阅者与回调方法的关系,在其他模块发送事件时,就会通过这个关系,让订阅者执行回调方法。
回调方法在这里被封装成了SubscriptionMethod,里面保存了在需要反射invoke方法时的各种参数,包括优先级,是否接收黏性事件和所在线程等信息。而要生成这些封装好的方法,则需要SubscriberMethodFinder,它可以在regster时得到订阅者的所有回调方法,并封装返回给EventBus。而右边的加速器模块,就是为了提高SubscriberMethodFinder的效率,这里就不再啰嗦。
至此EventBus 3.0的架构就分析完了,与之前EventBus老版本最明显的区别在于:分发事件的调度单位从订阅者,细化成了订阅者的回调方法。也就是说每个回调方法都有自己的优先级,执行线程和是否接收黏性事件,提高了事件分发的灵活程度,接下来我们在看核心功能的实现时更能体现这一点。
3.2 register
简单来说就是:根据订阅者的类来找回调方法,把订阅者和回调方法封装成关系,并保存到相应的数据结构中,为随后的事件分发做好准备,最后处理黏性事件。
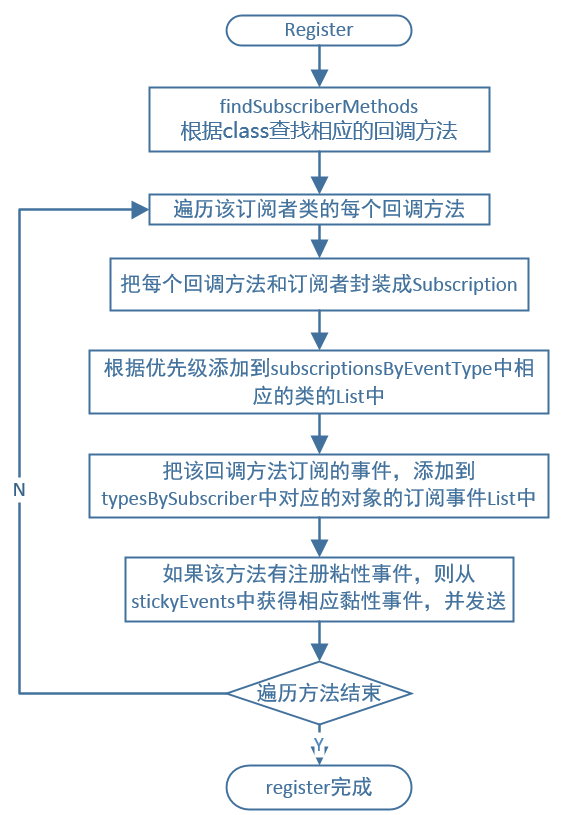
- 根据订阅者来找到订阅方法和事件,封装成
SubscriberMehod - 循环每个
SubscriberMethod - 通过事件得到该事件的所有订阅者列表,再根据优先级插入到
subscriptionsByEventType的所有订阅者列表中 - 通过订阅者得到该订阅者的所有事件列表,再将事件添加到
typeBySubscriber的所以事件列表中 - 是否是粘性事件
- 是的话进行分发,post此事件给当前订阅者,不是的话不管
- 结束本次循环,跳到 2
3.3 post
总的来说就是分析事件,得到所有监听该事件的订阅者的回调方法,并利用反射来invoke方法,实现回调。
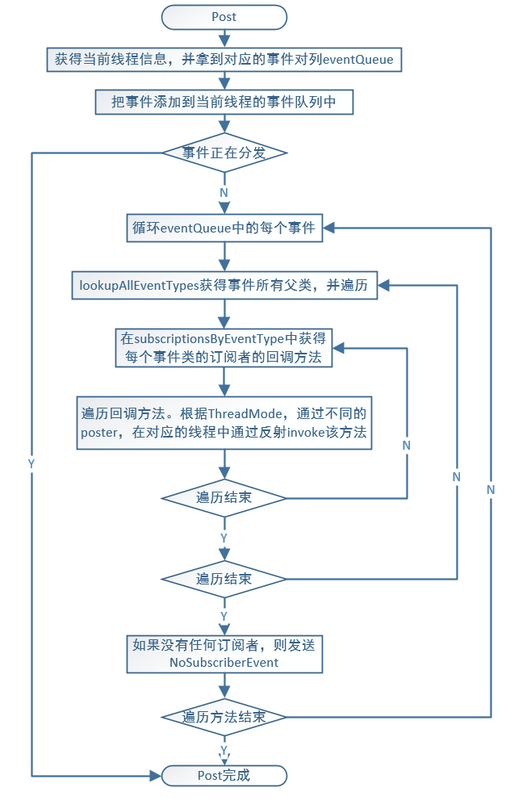
- 从
currentPostingThreadState中得到当前线程的PostThreadState信息 - 将此事件添加到
PostPostThreadState的事件队列中 - 判断是否再分发
- 不是的话,循环队列,是的话跳 7
- 判断是个需要继承关系
- 是的话,循环得到父类,不是的话跳 7
- 查找该事件的订阅者,循环订阅者
- 根据
ThreadMoth发送事件 - 结束本次循环订阅者,跳 7
- 结束本次循环队列,跳 4
在源代码中为了保证post执行不会出现死锁,等待和对同一订阅者发送相同的事件,增加了很多线程保护锁和标志位,值得我们每个开发者学习。
3.4 unregister
注销就比较简单了,把在注册时往两个数据结构中添加的订阅者信息删除即可:
至此大家对EventBus的运行原理应该有了一定的了解,虽然看起来像是一个复杂耗时的自动机,但大部分时候事件都是一瞬间就能分发到位的,而大家关心的性能问题反而是发生在注册EventBus的时候,因为需要遍历监听者的所有方法去找到回调的方法。作者也提到运行时注解的性能在Android上并不理想,为了解决这个问题,作者才会以索引的方式去生成回调方法表,也就是在EventBus 3.0中引入了EventBusAnnotationProcessor(注解分析生成索引)技术,大大提高了EventBus的运行效率。关于索引技术的源码分析,大家可以参考腾讯Bugly的这边文章:老司机教你 “飙” EventBus 3 。
四、缺点与问题
一直以来,EventBus被大家吐槽的一大问题就是代码混淆问题。
4.1 混淆问题
混淆作为版本发布必备的流程,经常会闹出很多奇奇怪怪的问题,且不方便定位,尤其是EventBus这种依赖反射技术的库。通常情况下都会把相关的类和回调方法都keep住,但这样其实会留下被人反编译后破解的后顾之忧,所以我们的目标是keep最少的代码。
首先,因为EventBus 3弃用了反射的方式去寻找回调方法,改用注解的方式。作者的意思是在混淆时就不用再keep住相应的类和方法。但是我们在运行时,却会报java.lang.NoSuchFieldError: No static field POSTING。网上给出的解决办法是keep住所有eventbus相关的代码:
1 | -keep class de.greenrobot.** {*;} |
其实我们仔细分析,可以看到是因为在SubscriberMethodFinder的findUsingReflection方法中,在调用Method.getAnnotation()时获取ThreadMode这个enum失败了,所以我们只需要keep住这个enum就可以了(如下)。
1 | -keep public enum org.greenrobot.eventbus.ThreadMode { public static *; } |
这样就能正常编译通过了,但如果使用了索引加速,是不会有上面这个问题的。因为在找方法时,调用的不是findUsingReflection,而是findUsingInfo。但是使用了索引加速后,编译后却会报新的错误:Could not find subscriber method in XXX Class. Maybe a missing ProGuard rule?
这就很好理解了,因为生成索引GeneratedSubscriberIndex是在代码混淆之前进行的,混淆之后类名和方法名都不一样了(上面这个错误是方法无法找到),得keep住所有被Subscribe注解标注的方法:
1 | -keepclassmembers class * { |
所以又倒退回了EventBus2.4时不能混淆onEvent开头的方法一样的处境了。所以这里就得权衡一下利弊:使用了注解不用索引加速,则只需要keep住EventBus相关的代码,现有的代码可以正常的进行混淆。而使用了索引加速的话,则需要keep住相关的方法和类。
4.2 跨进程问题
目前EventBus只支持跨线程,而不支持跨进程。如果一个app的service起到了另一个进程中,那么注册监听的模块则会收不到另一个进程的EventBus发出的事件。这里可以考虑利用IPC做映射表,并在两个进程中各维护一个EventBus,不过这样就要自己去维护register和unregister的关系,比较繁琐,而且这种情况下通常用广播会更加方便,大家可以思考一下有没有更优的解决方案。
4.3 事件环路问题
在使用EventBus时,通常我们会把两个模块相互监听,来达到一个相互回调通信的目的。但这样一旦出现死循环,而且如果没有相应的日志信息,很难定位问题。所以在使用EventBus的模块,如果在回调上有环路,而且回调方法复杂到了一定程度的话,就要考虑把接收事件专门封装成一个子模块,同时考虑避免出现事件环路。
五、总结
EventBus不论从使用方式和实现方式上都是非常值得我们学习的开源项目,可以说是目前消息通知里最好用的项目。但是业内对EventBus的主要争论点是在于EventBus使用反射会出现性能问题,实际上在EventBus里我们可以看到不仅可以使用注解处理器预处理获取订阅信息,EventBus也会将订阅者的方法缓存到METHOD_CACHE里避免重复查找,所以只有在最后invoke()方法的时候会比直接调用多出一些性能损耗。
而且相比旧版的2.x,现在新版的EventBus 3.0,订阅者已经没有固定的处理事件的方法了,onEvent、onEventMainThread、onEventBackgroundThread、onEventAsync都没有了,现在支持处理事件的方法名自定义,但必须public,只有一个参数,然后使用注解@Subscribe来标记该方法为处理事件的方法,ThreadMode和priority也通过该注解来定义。在subscriberMethodFinder中,通过反射的方式寻找事件方法。使用注解,用起来才更爽。
当然,EventBus并不是重构代码的唯一之选。作为观察者模式的“同门师兄弟”——RxJava,作为功能更为强大的响应式编程框架,可以轻松实现EventBus的事件总线功能(RxBus)。但毕竟大型项目要接入RxJava的成本高,复杂的操作符需要开发者投入更多的时间去学习。所以想在成熟的项目中快速地重构、解耦模块,EventBus依旧是我们的不二之选。
参考资料
- Markus Junginger - EventBus 3 beta announced at droidcon
- 老司机教你 “飙” EventBus 3 - 腾讯Bugly
- EventBus源码研读(上),(中),(下) - kymjs张涛
- EventBus3.0源码解析 - yydcdut
- EventBus 3.0 源代码分析 - Skykai
- EventBus 源码解析 - codeKK